

Pipelines
Create and manage Streamkap pipelines linking sources to destinations, monitor status, latency, and lag, and configure schema, transforms, and audits.
Pipelines in Streamkap represent the data flow from a source connector (database) to a destination connector (data warehouse or lake). Each pipeline can include transforms and topic configurations to shape and route your data.
Overview
The Pipelines page provides a centralized interface to:
- View all pipelines with their status, performance metrics, and configurations
- Create new pipelines connecting sources to destinations
- Monitor pipeline health, latency, and lag
- Filter pipelines by connector, status, or tags
- Configure pipeline settings including schema selection and transforms
- Access source and destination connector details
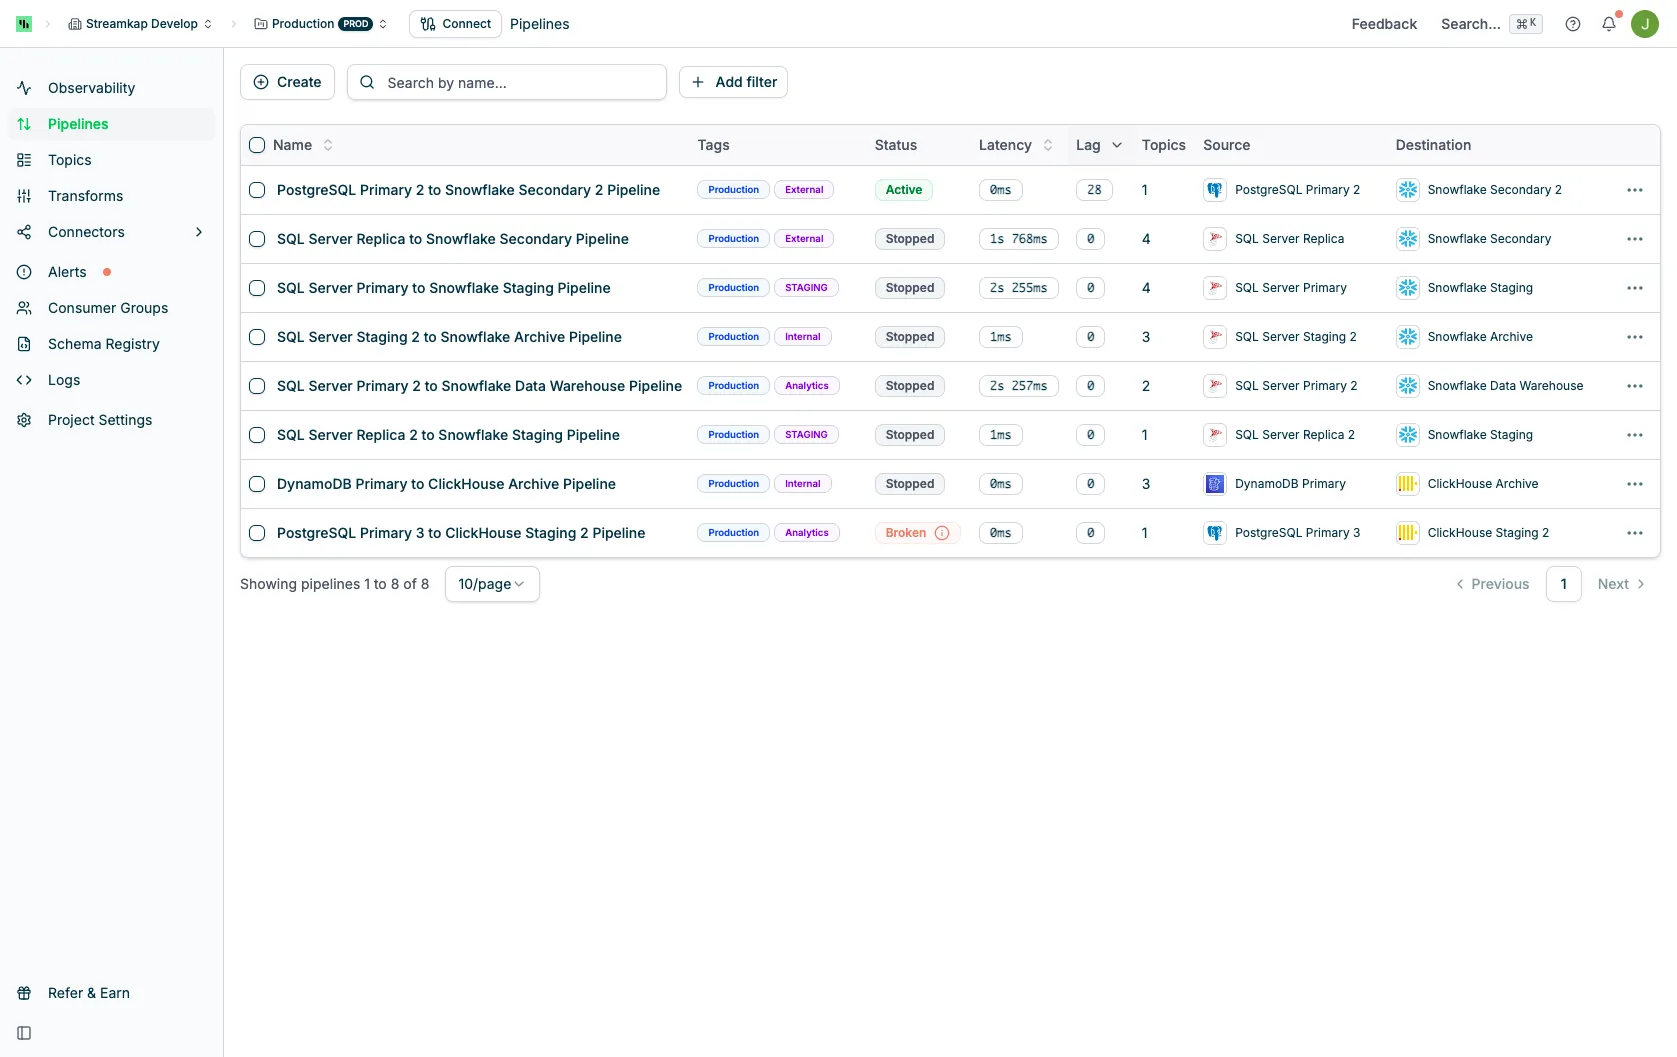
Table Columns
The Pipelines table displays the following information:
- Name: The pipeline name with checkbox for bulk selection
- Tags: Custom tags for organizing pipelines (e.g., Production, Development)
- Status: Current pipeline state with visual indicators:
- Active (green): Pipeline is running normally
- Stopped (gray): Pipeline is paused
- Broken (red with info icon): Pipeline has errors
- Throttled (amber): The source is waiting out its vendor’s rate limit and resumes on its own
- Latency: Time delay for data to flow through the pipeline
- Lag: Number of records behind the source
- Topics: Number of Kafka topics associated with the pipeline
- Source: Source connector type and name (clickable to view details)
- Destination: Destination connector type and name (clickable to view details)
- Actions: Actions menu (⋮) for quick actions
Pipeline Statuses
Pipelines can be in one of the following states:
Active
The pipeline is running and actively replicating data from source to destination. Indicated by green status badge.
Stopped
The pipeline has been manually paused or stopped. No data is flowing. Indicated by gray status badge.
Throttled
The pipeline’s source is an API source that has used up its vendor’s rate or usage limit, so syncing waits until the limit resets. Indicated by an amber status badge; the source’s page shows when it resumes. It resumes on its own from where it stopped, so there is nothing to do and no Resume action.
Broken
The pipeline has encountered an error and is not functioning. Click the info icon next to the status to see error details. Indicated by red status badge with an information icon.
Filtering and Search
Use the filtering options at the top of the page to quickly find specific pipelines:
Search
Type in the search box to filter pipelines by name. The search filters in real-time as you type.
Filter by Connectors
Click the Connectors dropdown to filter pipelines by:
- Source connector type (MySQL, PostgreSQL, MongoDB, etc.)
- Destination connector type (Snowflake, BigQuery, Databricks, etc.)
Filter by Status
Click the Status dropdown to show only pipelines with specific statuses:
- Active
- Stopped
- Broken
- Throttled
Filter by Tags
Click the Tags dropdown to filter pipelines by assigned tags (Production, Development, custom tags).
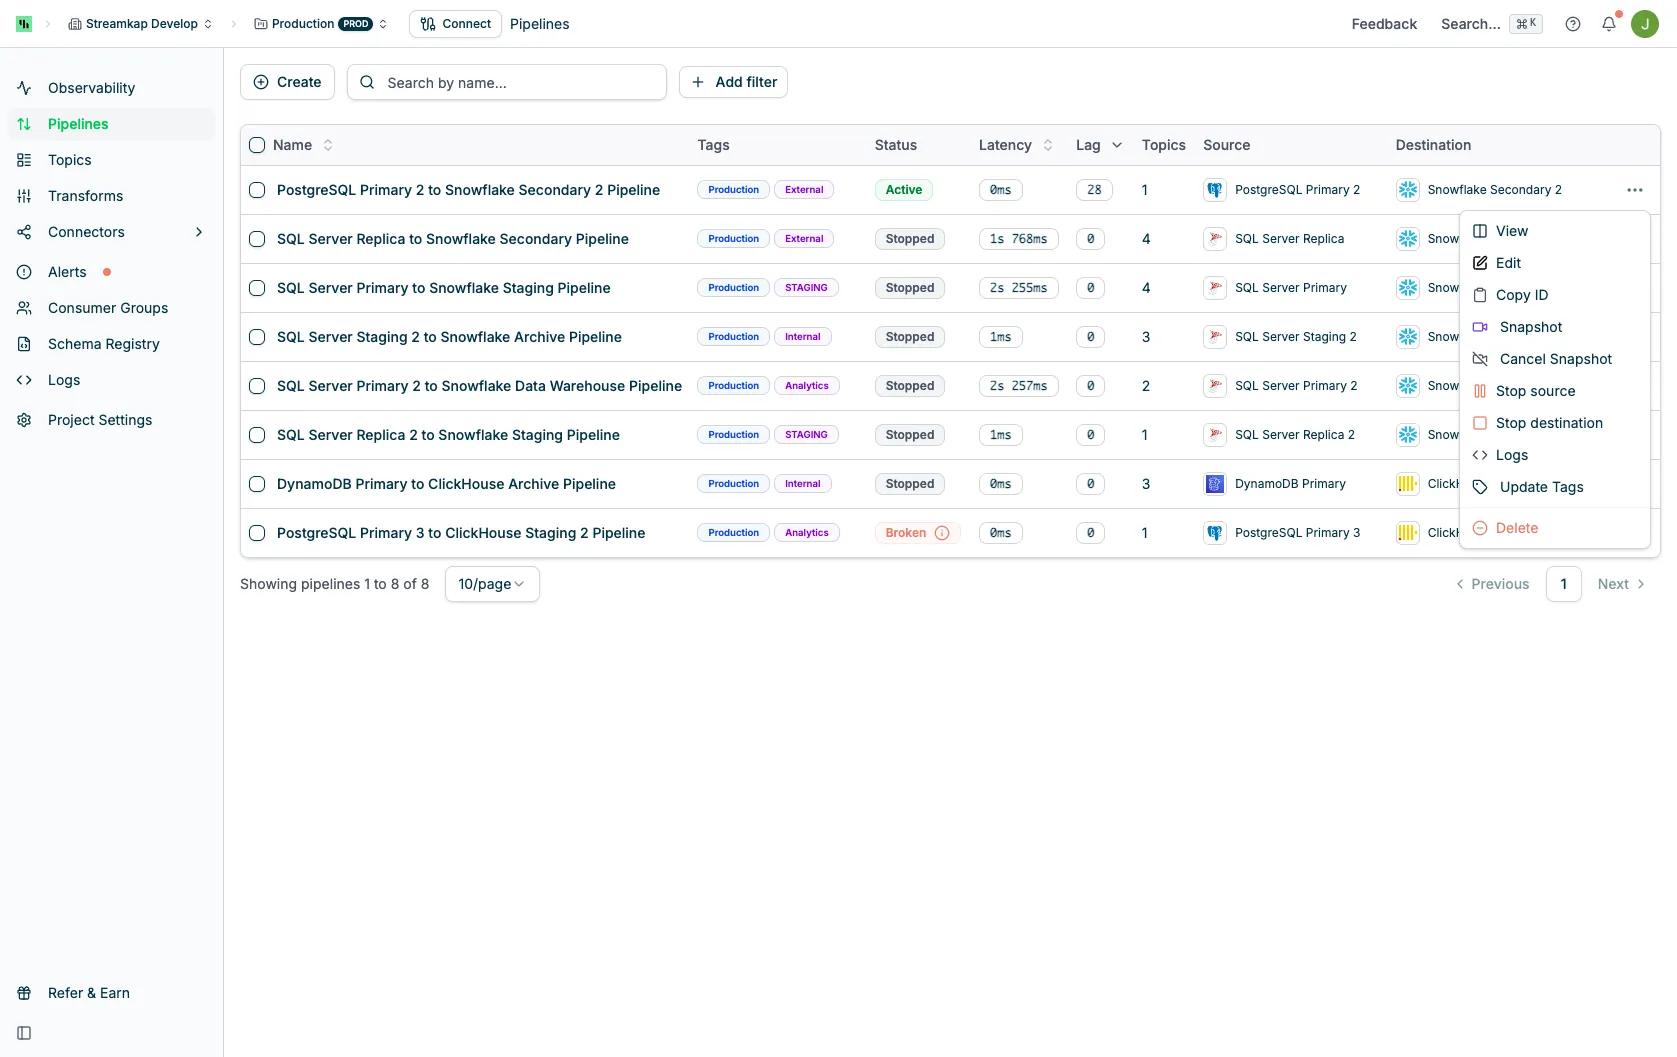
Row Actions Menu
Click the actions menu (⋮) on any pipeline row to access the following options:
- View: Open the pipeline detail page
- Edit: Open the pipeline settings for editing
- Copy ID: Copy the pipeline UUID to clipboard (useful for API calls and support tickets)
- Snapshot: Trigger a new data snapshot for the pipeline’s source
- Cancel Snapshot: Stop an in-progress snapshot operation
- Resume source: Resume the source connector if it was stopped
- Stop source: Stop the source connector from streaming data
- Resume destination: Resume the destination connector if it was stopped
- Stop destination: Stop the destination connector from consuming data
- Logs: View logs for this pipeline
- Update Tags: Add or modify tags assigned to this pipeline
- Delete: Remove the pipeline (requires confirmation)
Creating a Pipeline
To create a new pipeline:
Click Create
Click the Create button at the top left of the Pipelines page. This launches the three-step create wizard.
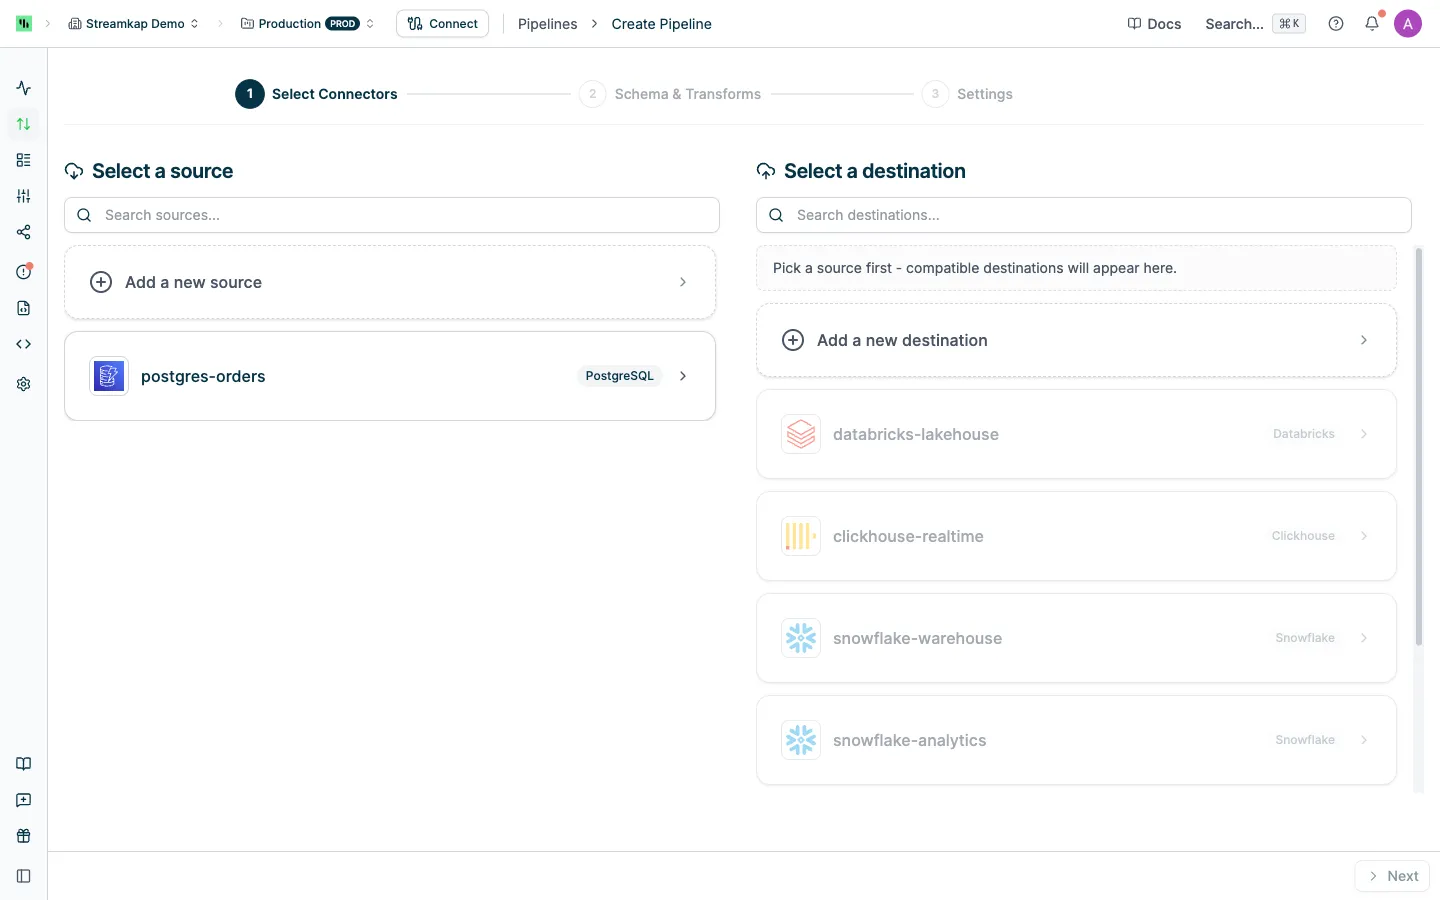
Select Connectors
Pick an existing source on the left and a compatible destination on the right (or use Add a new source / Add a new destination to create one inline). Only destinations compatible with the chosen source are enabled.
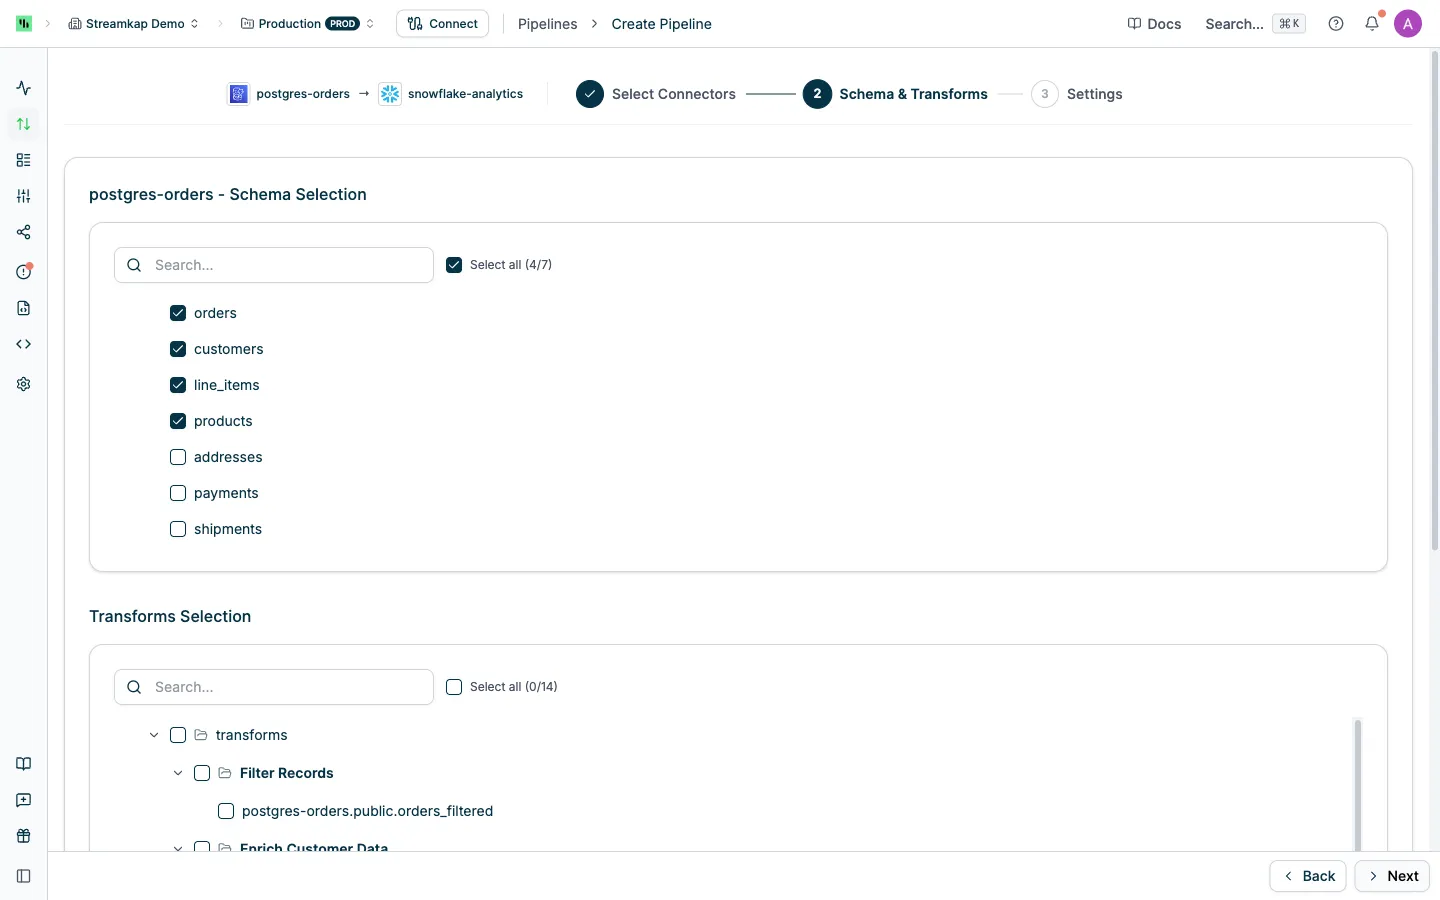
Schema & Transforms
Choose which databases and tables from the source to replicate, and optionally select transform topics to include in the pipeline.
Settings
Set the pipeline name, tags, and decide whether to trigger an incremental snapshot of the selected topics on creation. Click Create to save and start the pipeline.
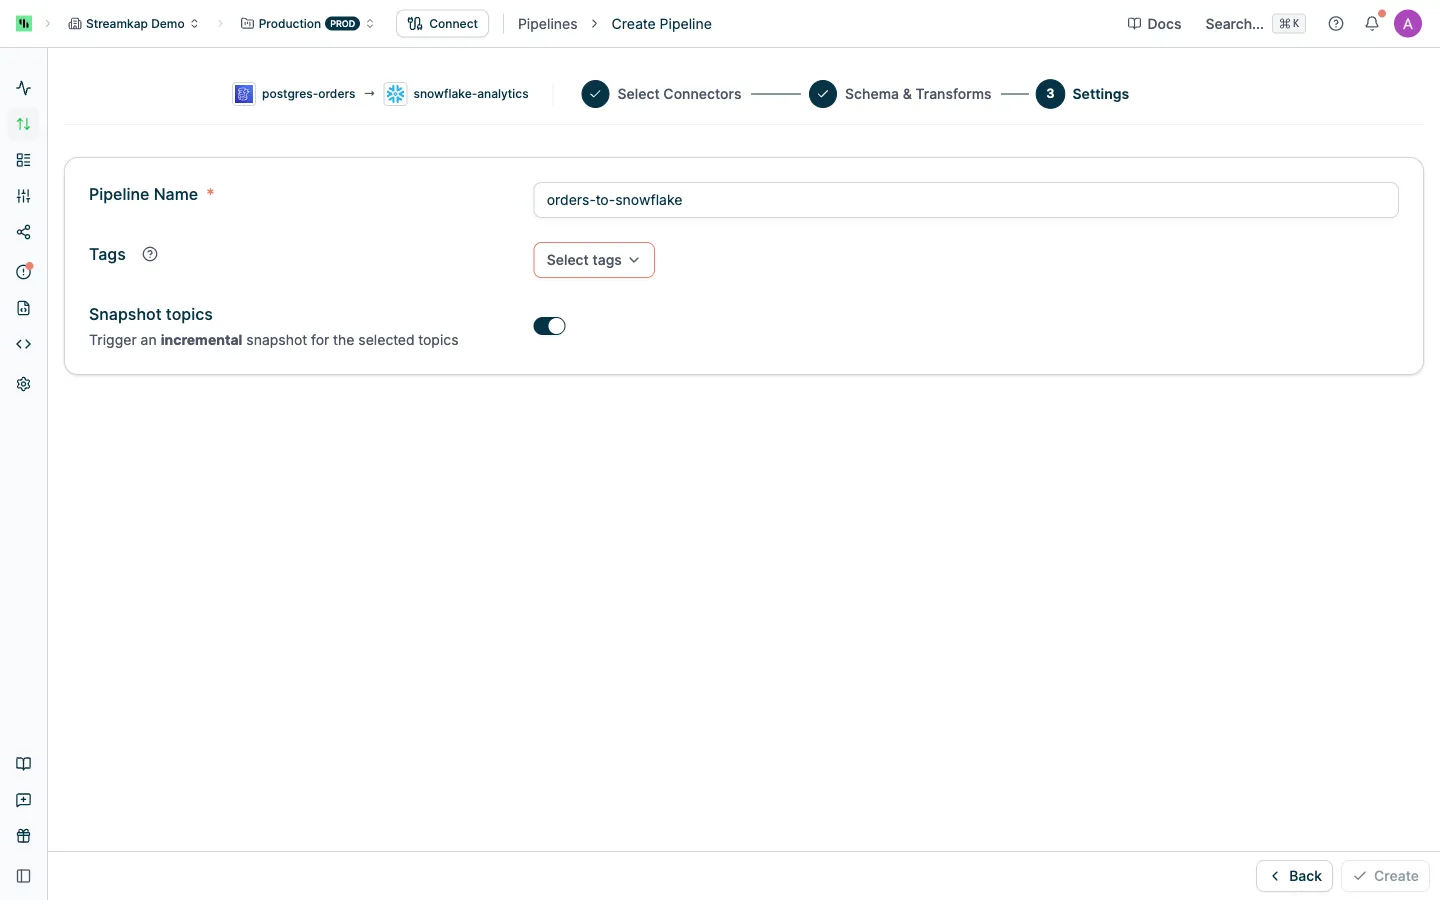
Pipeline Detail View
Click on any pipeline name to view its detail page with comprehensive information and configuration options.
Status Tab
The Status tab provides an overview of the pipeline’s current state and performance:
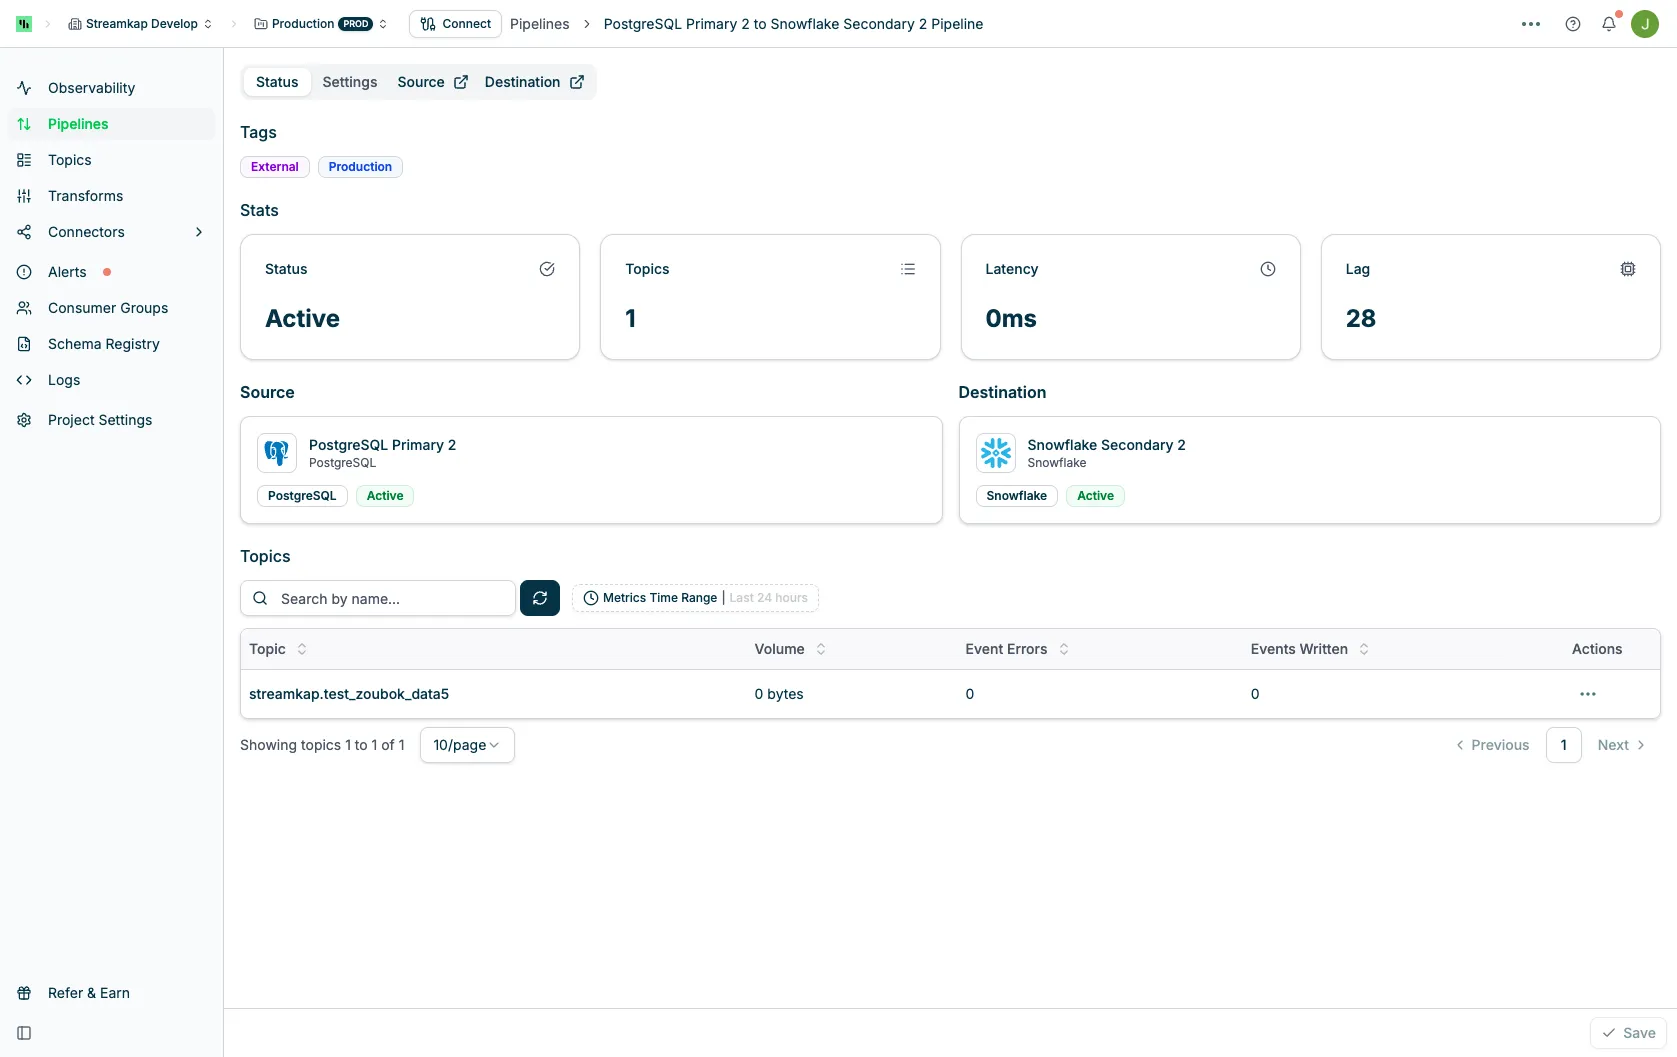
Tags Section
- Displays all tags assigned to the pipeline
- Tags help organize and categorize pipelines
Stats Section
- Status: Current pipeline state (Active, Stopped, or Broken)
- Topics: Number of Kafka topics in the pipeline
- Latency: Current latency measurement
- Lag: Current lag count
Source and Destination Section
- Shows connected source connector with type, name, and status
- Shows connected destination connector with type, name, and status
- Click on connector cards to navigate to their detail pages
Topics Table Lists all topics flowing through the pipeline:
- Name: Topic name (clickable to view topic details)
- Type:
- Topic: Standard Kafka topic from source tables
- Transform: Topic created by a transform operation
- Actions: Actions menu (⋮) for each topic
Settings Tab
The Settings tab allows you to configure pipeline behavior and data selection:
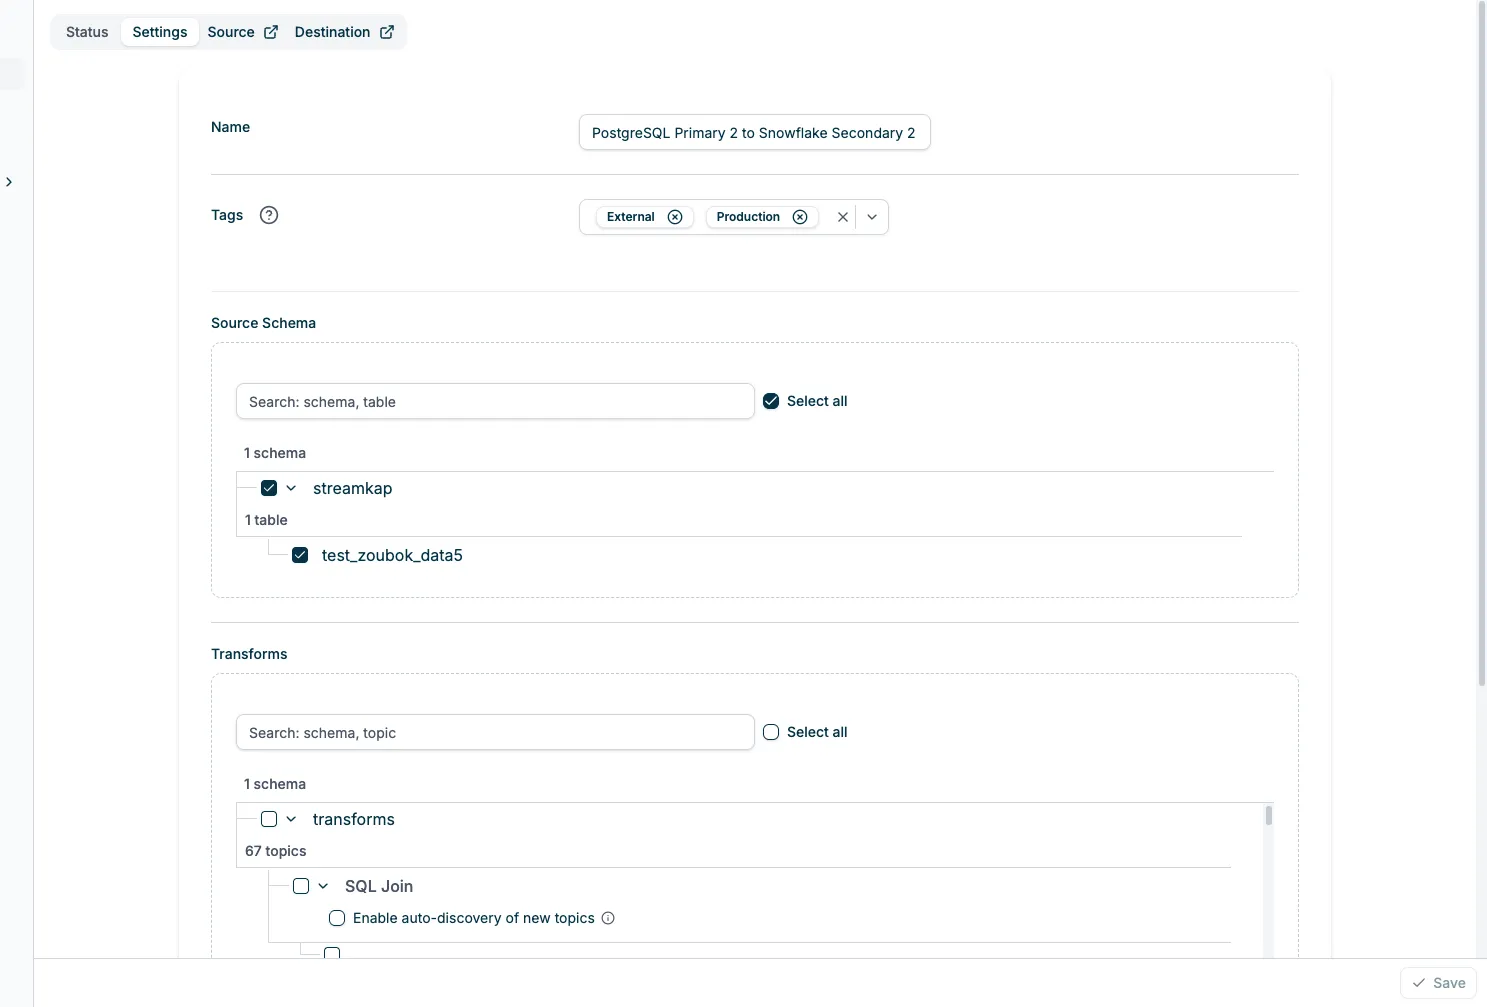
Name
- Edit the pipeline name
Tags
- Add or remove tags
- Create new tags or select from existing ones
- Tags support filtering and organization
Audit Config
- Toggle to enable periodic auditing of data consistency
- Select the table that will be used for auditing
- Set the interval for how often the audit runs (e.g., 30 minutes)
- Select the timestamp column to track changes
Source Schema
- Select which databases and tables to replicate
- Search functionality to filter databases and tables
- Expandable tree view showing:
- Database level with checkbox to select all tables
- Individual tables with individual checkboxes
- “Select all” option to include all databases and tables
Transforms
- Select specific transformed topics to include in the pipeline
- Search functionality to filter transform topics
- “Select all” option to include all transform topics
- Check “Enable auto-discovery of new topics” and input the regex pattern to automatically include new transform topics created in the future that match the pattern
Source and Destination Links
The pipeline detail page includes direct links to:
- Source tab/link: Opens the source connector detail page in a new context
- Destination tab/link: Opens the destination connector detail page in a new context
These links appear as tabs with external link icons, indicating they navigate away from the pipeline view.
Pagination
At the bottom of the pipelines table:
- View the range of pipelines currently displayed (e.g., “Showing pipelines 1 to 10 of 20”)
- Change the number of pipelines per page (10, 25, 50, 100)
- Navigate between pages using Previous/Next buttons or page numbers
Performance Metrics
Latency
Latency measures how long it takes for data to flow from the source through the pipeline to the destination. Lower latency means near real-time replication.
- 0ms - 100ms: Excellent, near real-time
- 100ms - 1s: Good, minimal delay
- >1s: May indicate performance issues or heavy load
Lag
Lag represents the number of records or events that are waiting to be processed. Zero lag means the pipeline is fully caught up with the source.
- 0: Fully caught up
- >0: Pipeline is behind, processing backlog
Bulk Actions
Select multiple pipelines using the checkboxes in the Name column to perform actions on multiple pipelines at once. When pipelines are selected, the bulk actions bar appears at the top of the table.
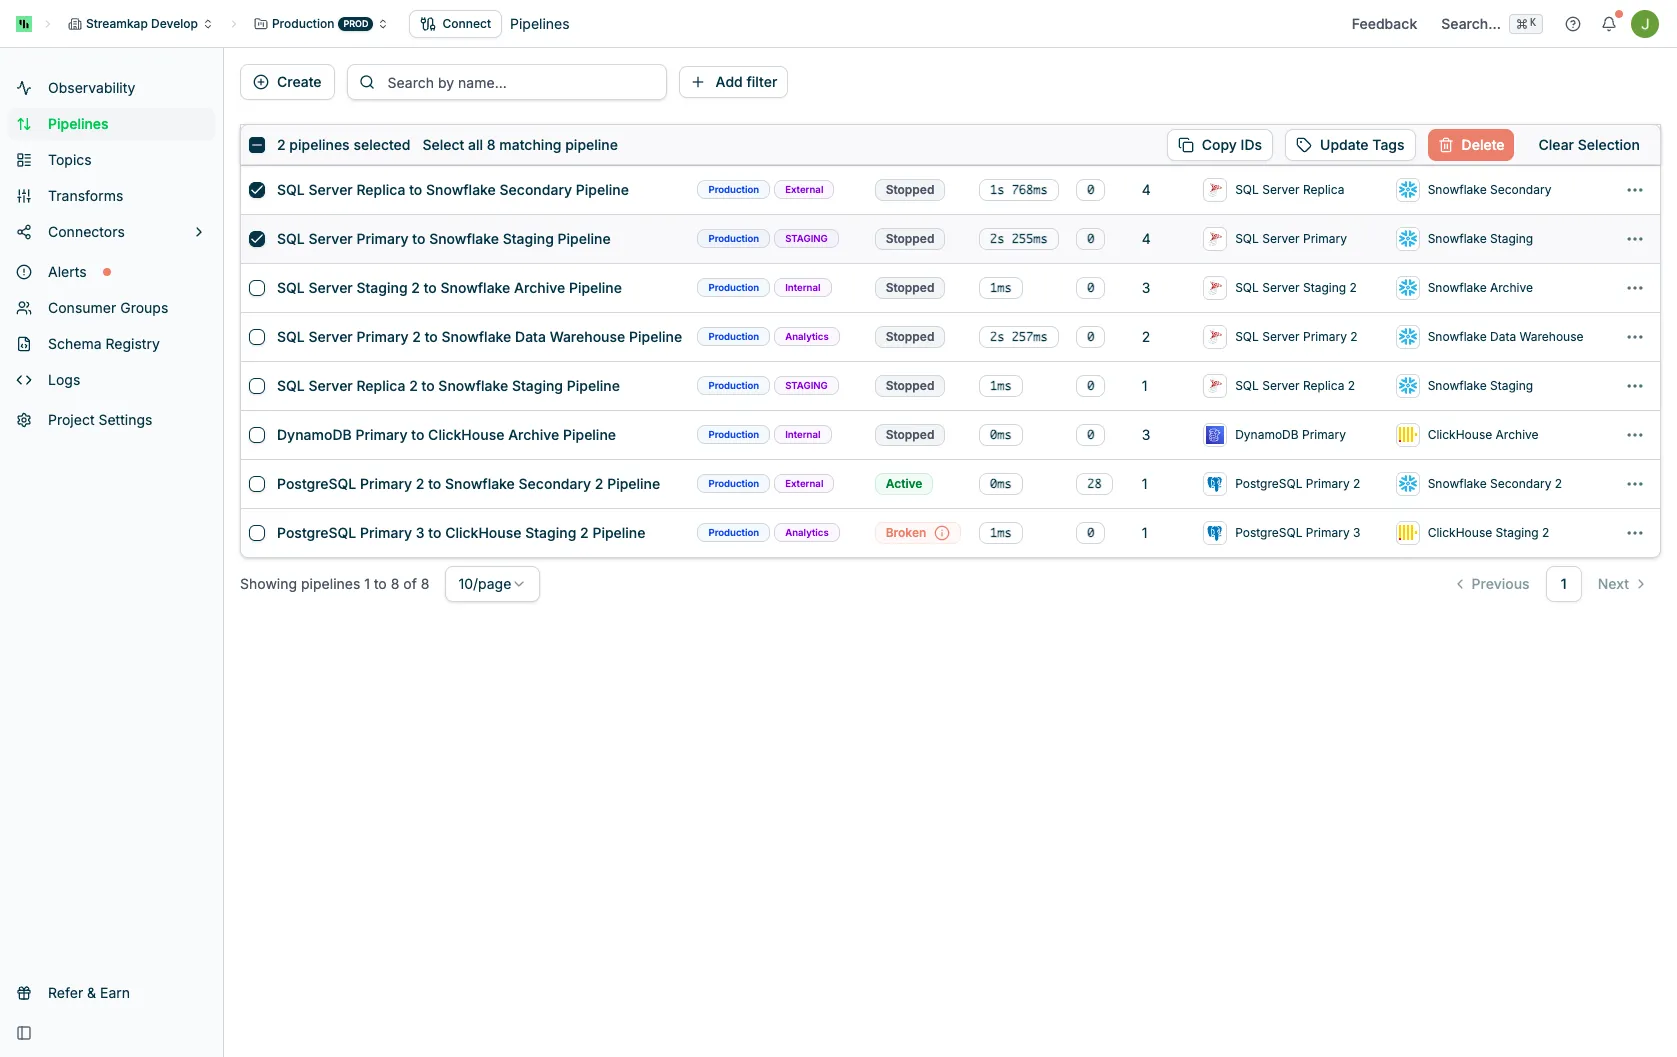
Available bulk action:
- Update Tags: Add or remove tags for all selected pipelines simultaneously