> ## Documentation Index
> Fetch the complete documentation index at: https://docs.streamkap.com/llms.txt
> Use this file to discover all available pages before exploring further.
# Project Keys
> Create unified credentials that bundle API access, Kafka access, and MCP tool scoping into a single downloadable file.
Project Keys are downloadable credential files that bundle one or more of the following into a single `.json` artifact:
* **API access** — a Client ID and Secret for the [REST API](/api-reference/authentication/access-token), [CLI](/cli), and [Terraform](/streamkap-provider-for-terraform)
* **Kafka access** — SASL credentials and proxy endpoints for direct topic consumption
* **MCP tool scoping** — controls which tools an AI agent can use via the [MCP Server](/mcp-server)
You can create a key with any combination of these capabilities, and add more later without recreating the key.
## Prerequisites
* You need the **Project Keys** write permission (included in the **Admin** and **Data Admin** roles)
* **Kafka access** requires an AWS-hosted project with a dedicated namespace — if your project doesn't meet this, the Kafka option will be disabled with a tooltip explaining why
## Create a Project Key
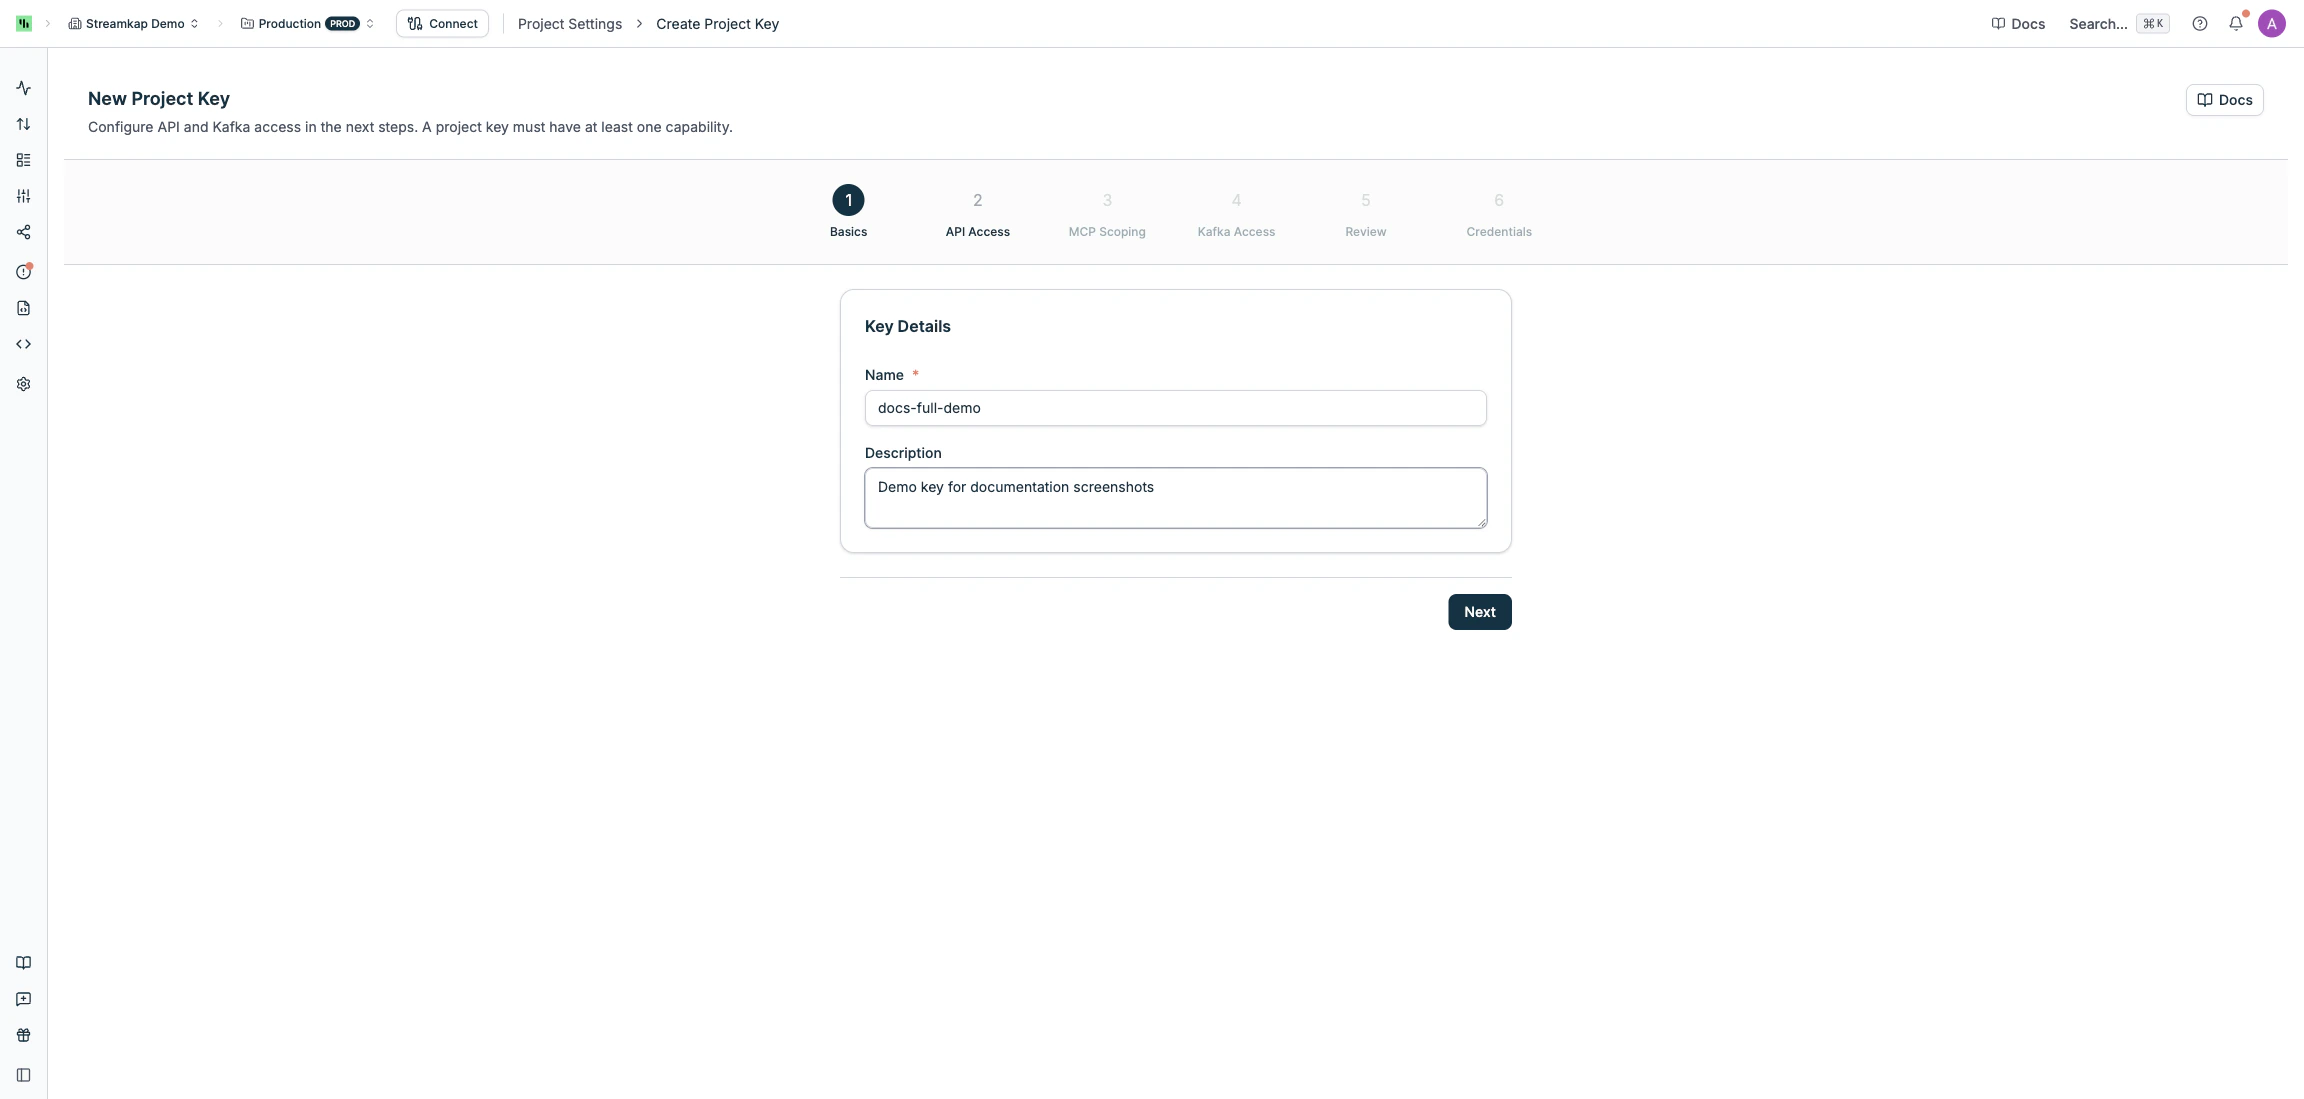
Navigate to **Project Settings** > **Project Keys** and click **Create Project Key**. The wizard walks you through six steps.
### Step 1: Basics
Enter a **Name** (required, up to 100 characters) and an optional **Description** for the key.
 ### Step 2: API Access
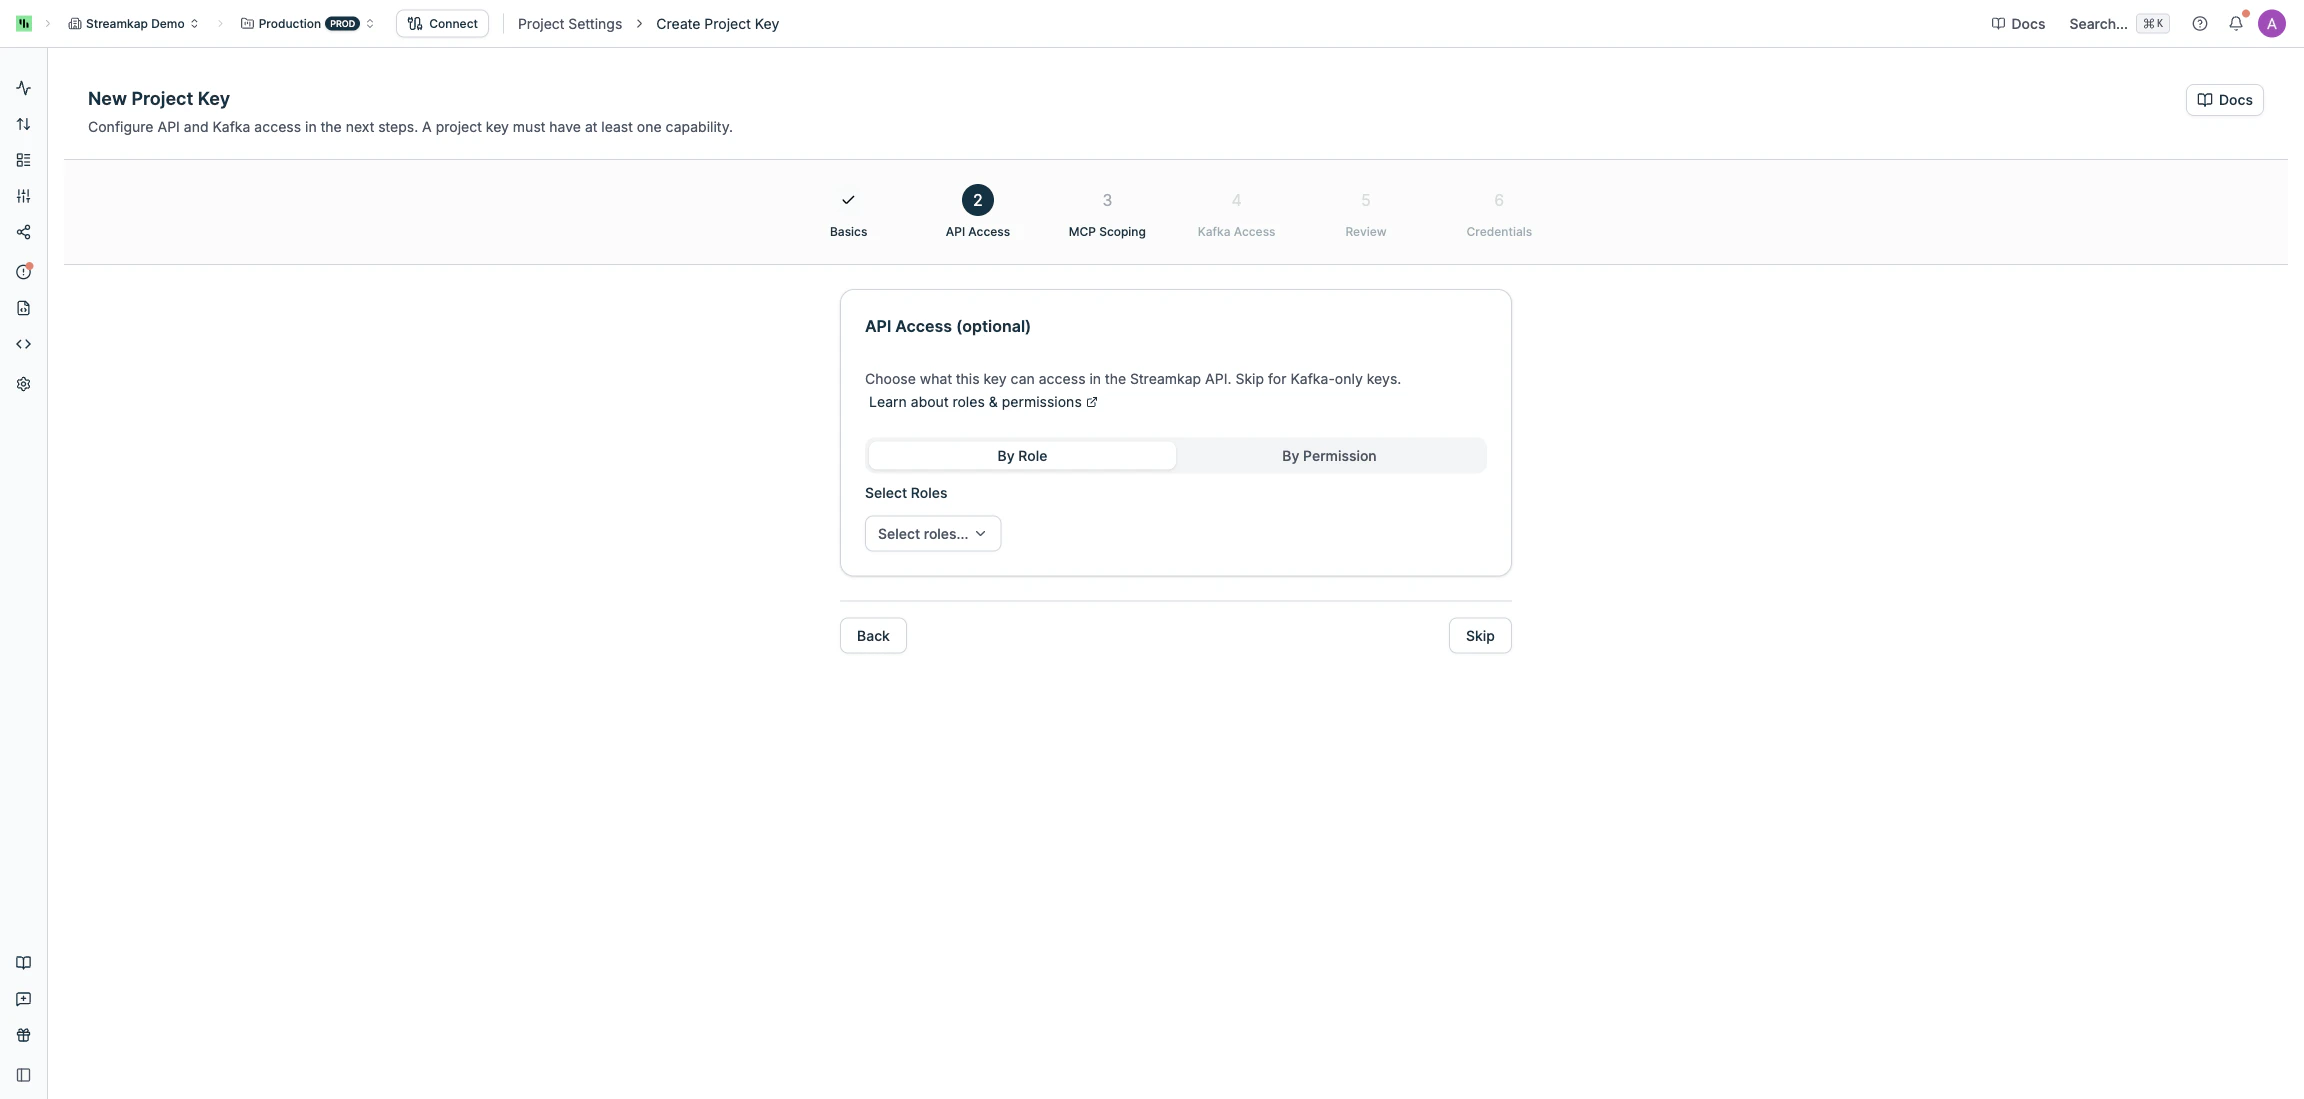
Choose what this key can access in the Streamkap REST API. You can skip this step to create a Kafka-only key.
Assign access using one of two modes:
* **By Role** (recommended) — select one or more roles (e.g. Admin, Data Admin, Read Only). Roles can be changed after creation.
* **By Permission** — select individual permissions for fine-grained control.
Fine-grained permissions cannot be changed after the key is created. Use role-based access if you need flexibility.
### Step 2: API Access
Choose what this key can access in the Streamkap REST API. You can skip this step to create a Kafka-only key.
Assign access using one of two modes:
* **By Role** (recommended) — select one or more roles (e.g. Admin, Data Admin, Read Only). Roles can be changed after creation.
* **By Permission** — select individual permissions for fine-grained control.
Fine-grained permissions cannot be changed after the key is created. Use role-based access if you need flexibility.
 ### Step 3: MCP Scoping
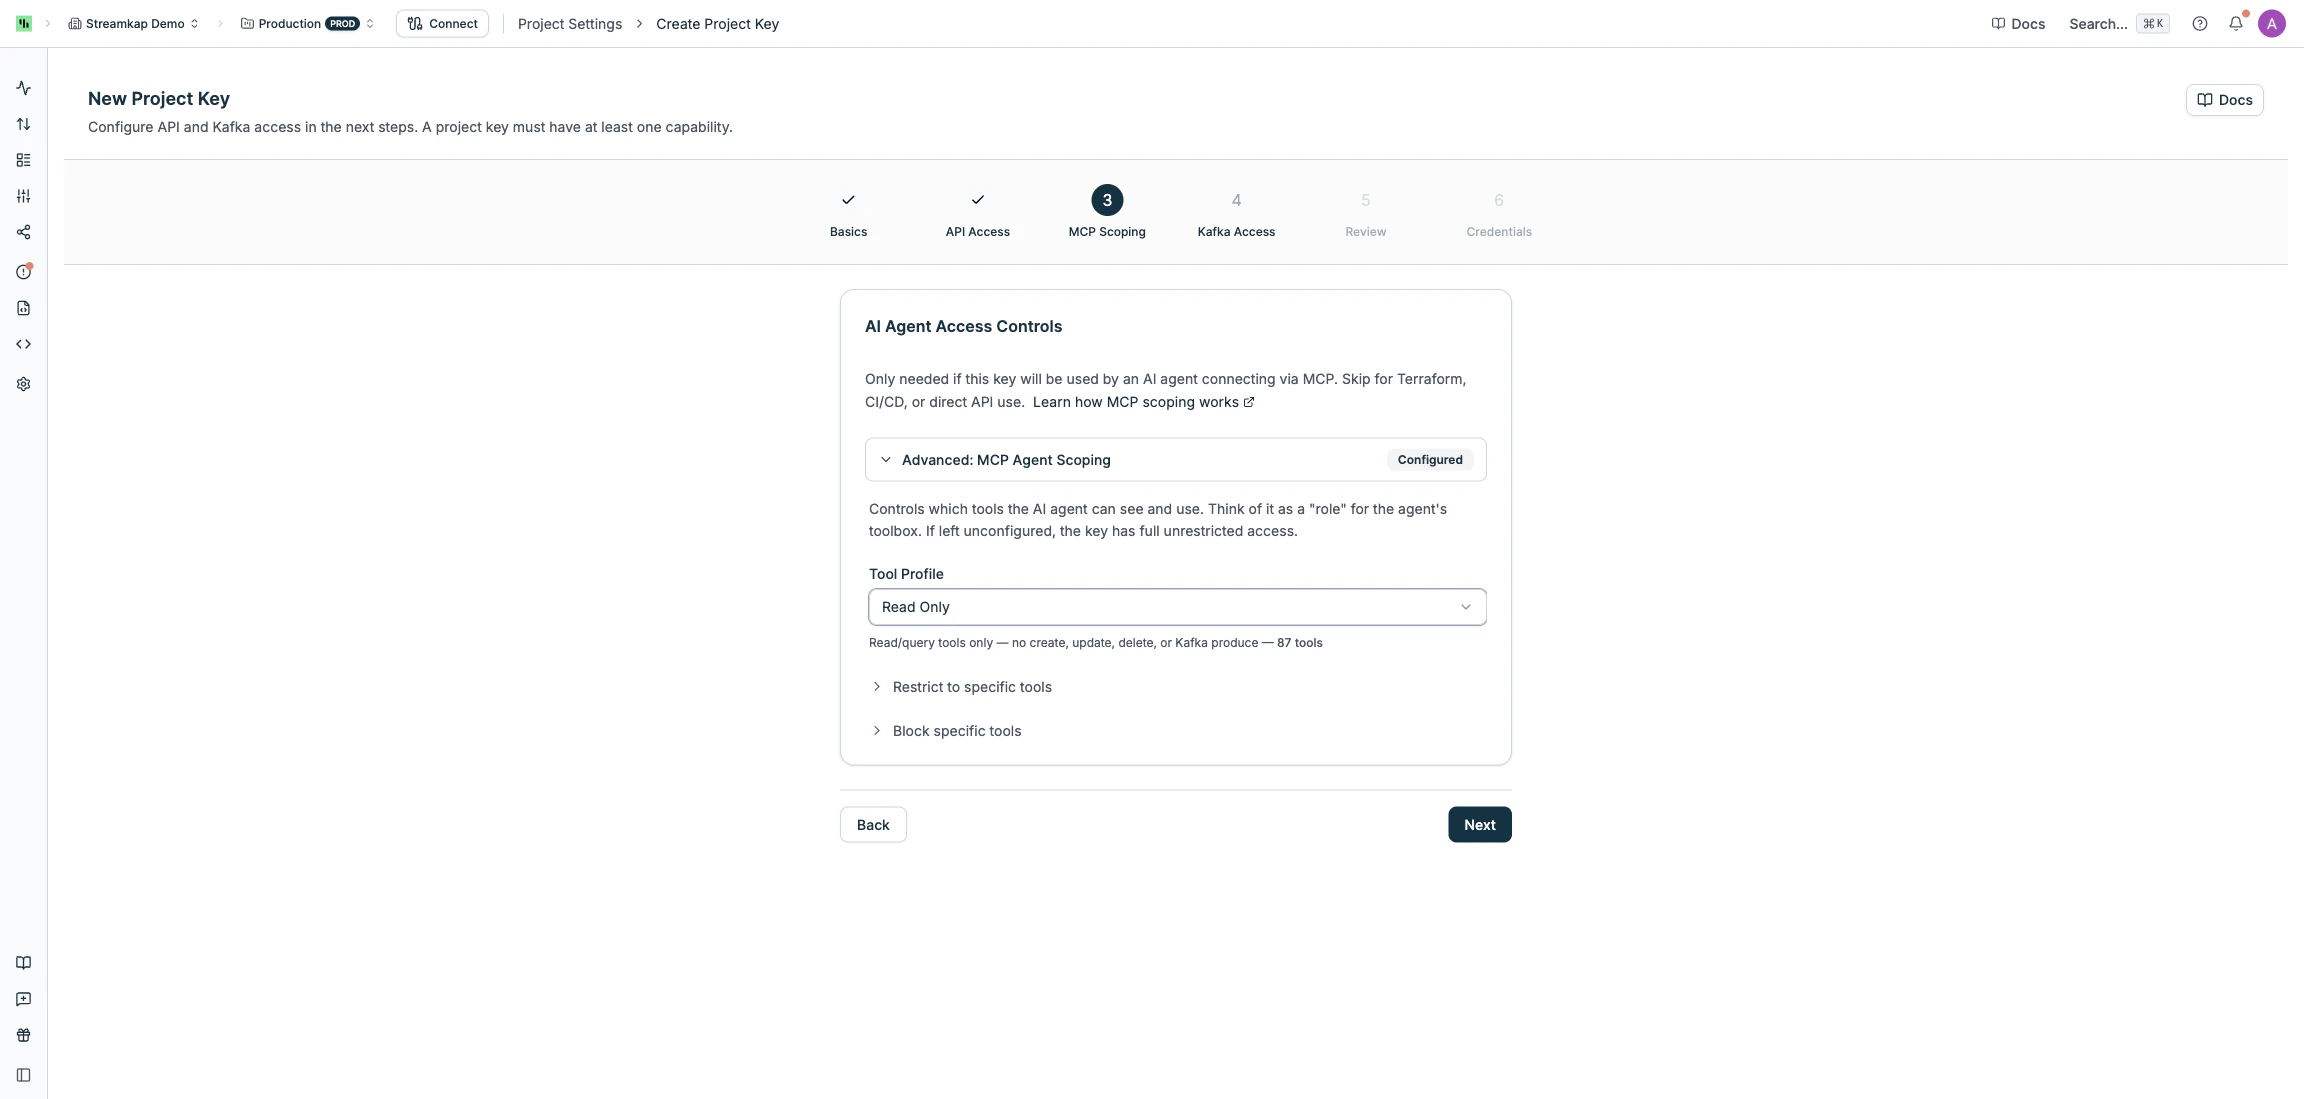
If this key will be used by an AI agent via the [MCP Server](/mcp-server), you can restrict which tools the agent can call. Skip this step for CLI, Terraform, or direct API use.
Choose a **Tool Profile** preset, or fine-tune access with allowed/blocked tool lists:
| Profile | Description |
| -------------- | --------------------------------------------------------------------- |
| Full | All tools — no restrictions |
| Read Only | Read/query tools only — no create, update, delete, or Kafka produce |
| Agent Operator | Read + safe operations (pause, resume, restart) — no create or delete |
| Infra Admin | Full infrastructure management — no direct Kafka data access |
You can further customize with:
* **Allowed tools** — only these tools are available (overrides profile)
* **Blocked tools** — remove specific tools from the profile
Tool scoping is enforced server-side. The credential file includes the scoping configuration for reference, but the MCP server always checks the authoritative settings stored in Streamkap — editing the file has no effect.
### Step 3: MCP Scoping
If this key will be used by an AI agent via the [MCP Server](/mcp-server), you can restrict which tools the agent can call. Skip this step for CLI, Terraform, or direct API use.
Choose a **Tool Profile** preset, or fine-tune access with allowed/blocked tool lists:
| Profile | Description |
| -------------- | --------------------------------------------------------------------- |
| Full | All tools — no restrictions |
| Read Only | Read/query tools only — no create, update, delete, or Kafka produce |
| Agent Operator | Read + safe operations (pause, resume, restart) — no create or delete |
| Infra Admin | Full infrastructure management — no direct Kafka data access |
You can further customize with:
* **Allowed tools** — only these tools are available (overrides profile)
* **Blocked tools** — remove specific tools from the profile
Tool scoping is enforced server-side. The credential file includes the scoping configuration for reference, but the MCP server always checks the authoritative settings stored in Streamkap — editing the file has no effect.
 ### Step 4: Kafka Access
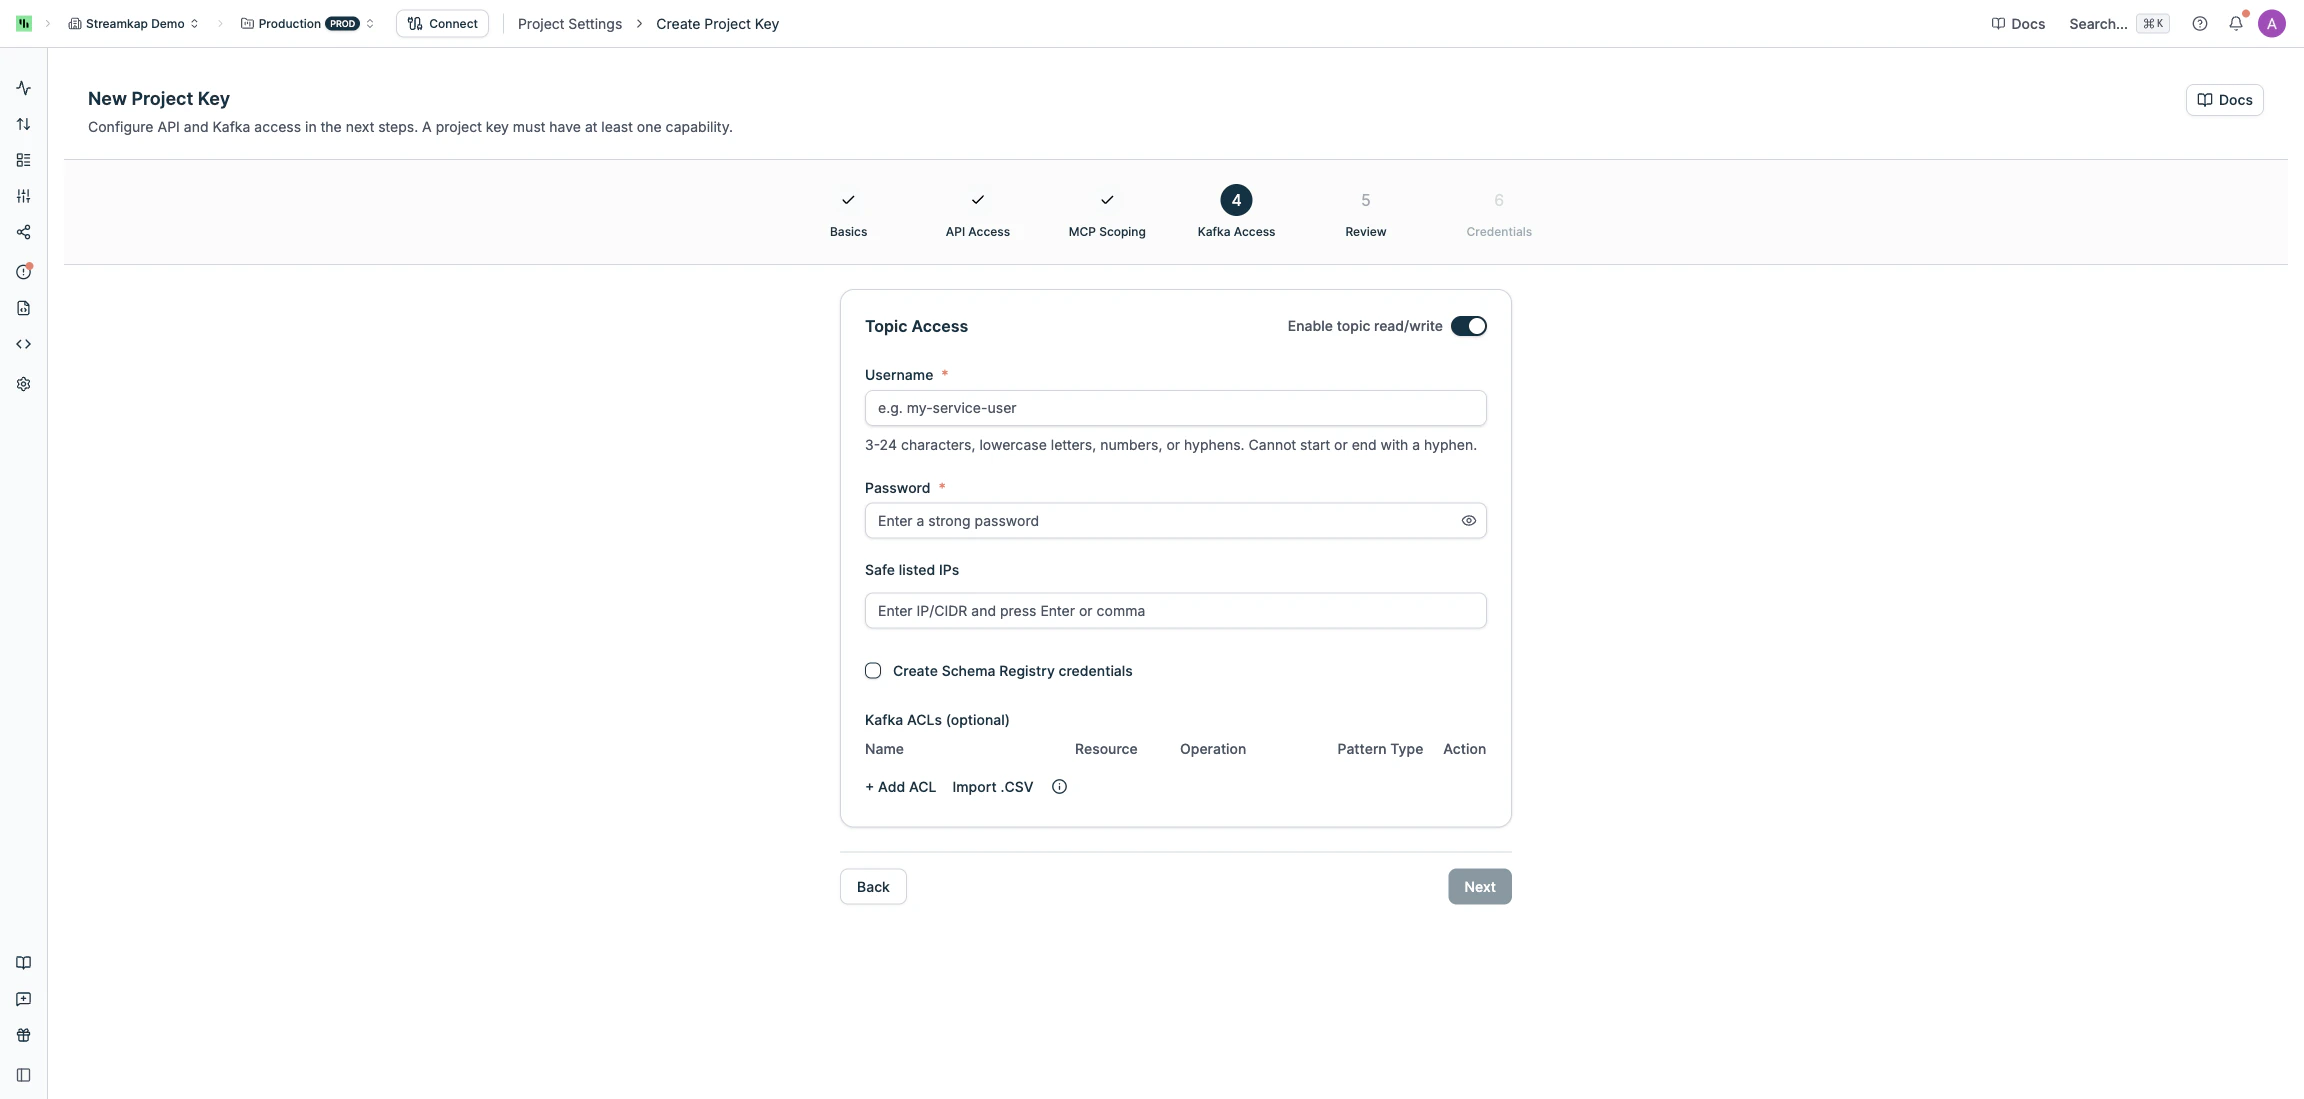
Toggle **Enable topic read/write** to create dedicated Kafka credentials alongside your key. This gives the key its own SASL username, proxy endpoints, and ACL rules.
When enabled, configure:
* **Username** — 3-24 characters, lowercase letters, numbers, or hyphens. Cannot start or end with a hyphen.
* **Password** — 12-128 characters with at least one uppercase letter, one lowercase letter, one digit, and one special character
* **Safe listed IPs** (optional) — restrict connections to specific IP addresses or CIDR ranges (e.g. `192.168.1.0/24`)
* **Create Schema Registry credentials** (optional) — generates additional credentials for schema management
* **Kafka ACLs** (optional) — define which topics and consumer groups this key can access. Click **+ Add ACL** to add rules, or **Import .CSV** for bulk import.
Each ACL rule specifies:
* **Name** — the topic name, consumer group name, or prefix to match
* **Resource** — `TOPIC` or `GROUP`
* **Operation** — `READ`, `WRITE`, `CREATE`, `DELETE`, `ALTER`, `DESCRIBE`, `ALL`, etc. (GROUP resources support `READ`, `DELETE`, and `DESCRIBE`)
* **Pattern Type** — `LITERAL` (exact match) or `PREFIXED` (matches resources starting with the name)
### Step 4: Kafka Access
Toggle **Enable topic read/write** to create dedicated Kafka credentials alongside your key. This gives the key its own SASL username, proxy endpoints, and ACL rules.
When enabled, configure:
* **Username** — 3-24 characters, lowercase letters, numbers, or hyphens. Cannot start or end with a hyphen.
* **Password** — 12-128 characters with at least one uppercase letter, one lowercase letter, one digit, and one special character
* **Safe listed IPs** (optional) — restrict connections to specific IP addresses or CIDR ranges (e.g. `192.168.1.0/24`)
* **Create Schema Registry credentials** (optional) — generates additional credentials for schema management
* **Kafka ACLs** (optional) — define which topics and consumer groups this key can access. Click **+ Add ACL** to add rules, or **Import .CSV** for bulk import.
Each ACL rule specifies:
* **Name** — the topic name, consumer group name, or prefix to match
* **Resource** — `TOPIC` or `GROUP`
* **Operation** — `READ`, `WRITE`, `CREATE`, `DELETE`, `ALTER`, `DESCRIBE`, `ALL`, etc. (GROUP resources support `READ`, `DELETE`, and `DESCRIBE`)
* **Pattern Type** — `LITERAL` (exact match) or `PREFIXED` (matches resources starting with the name)
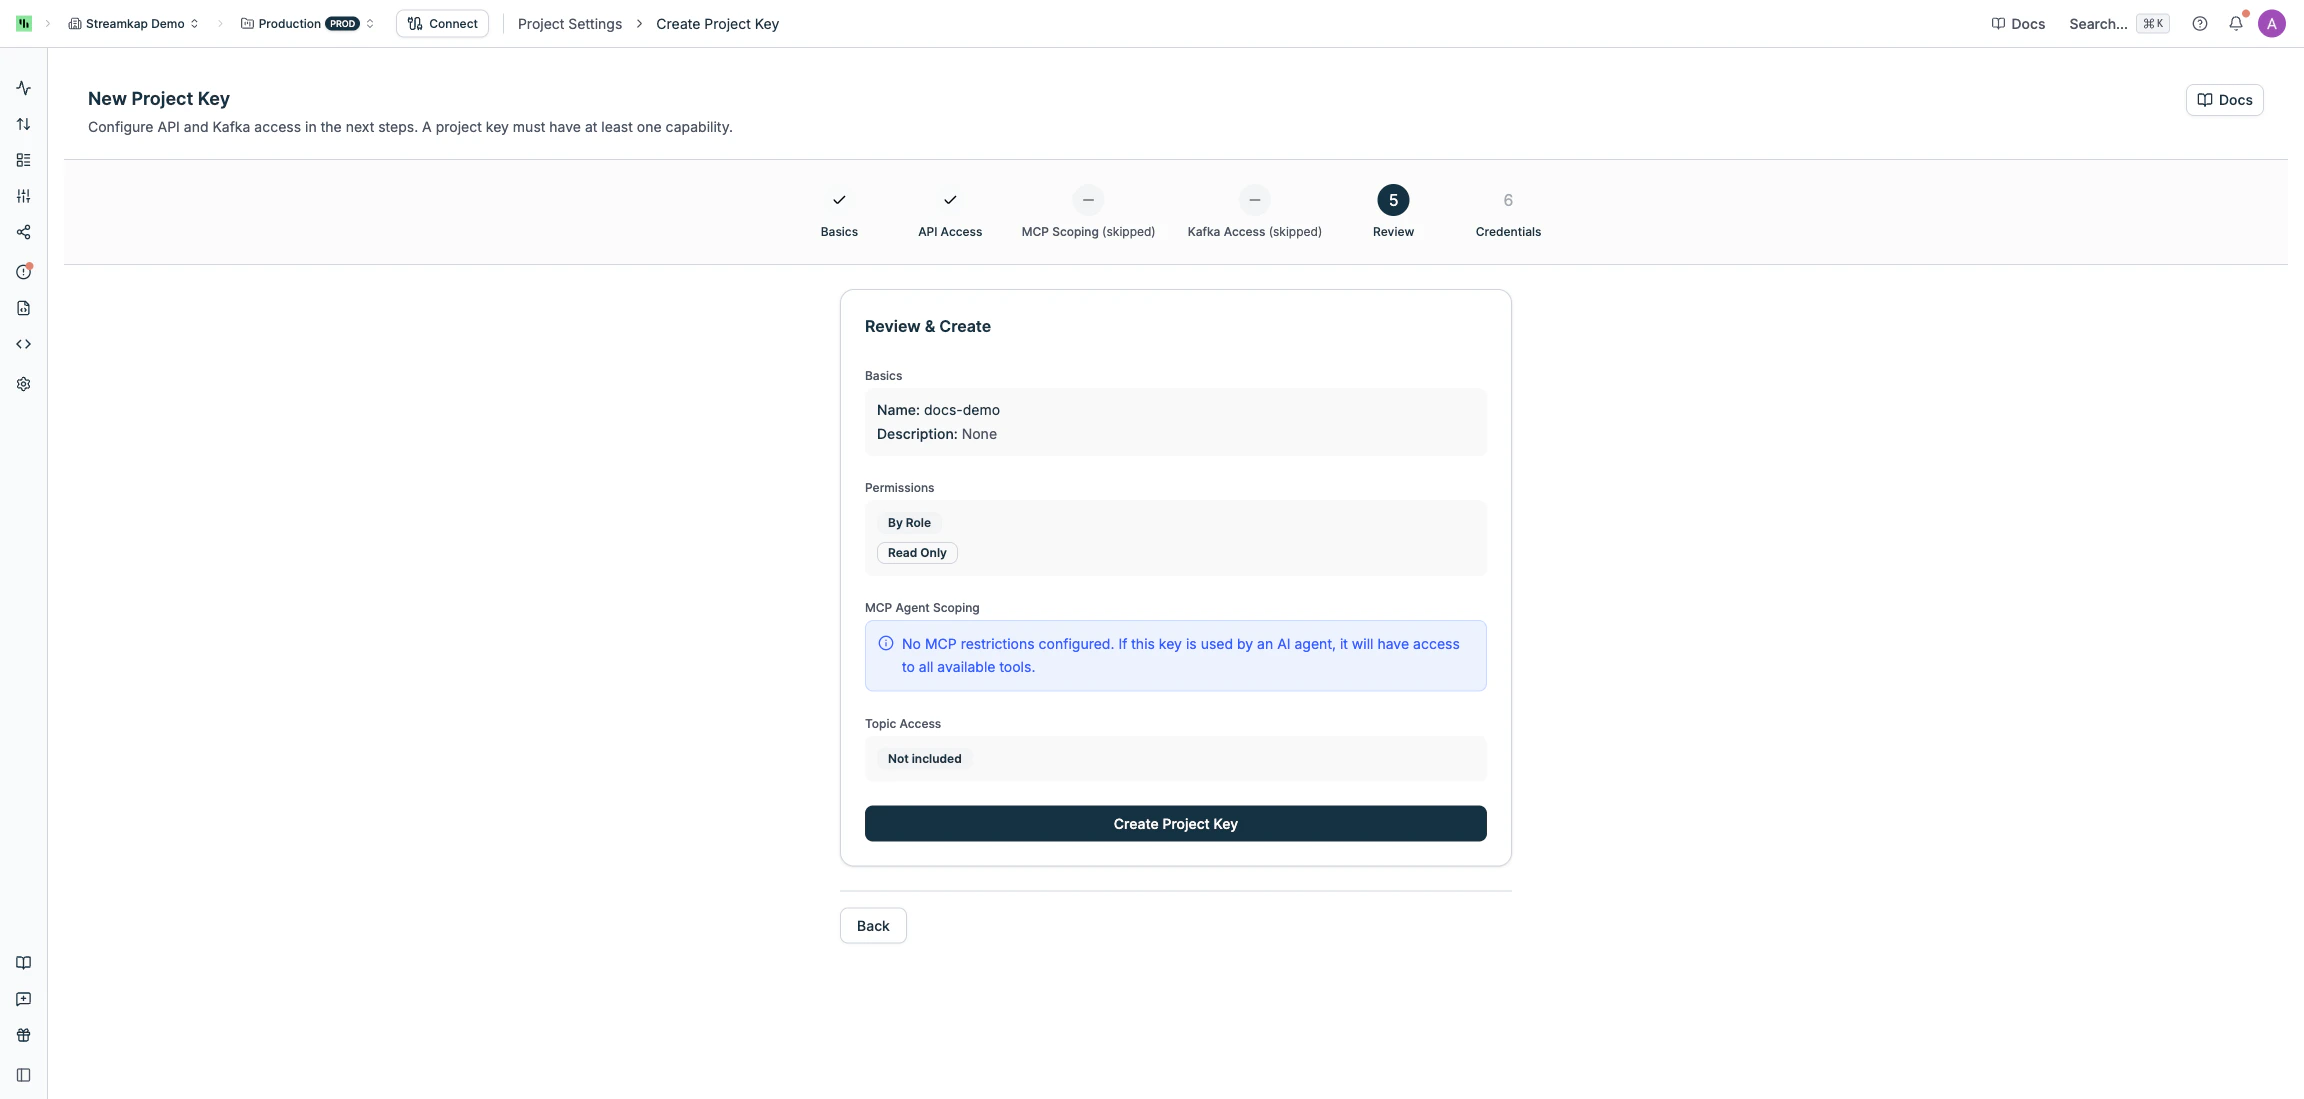
 ### Step 5: Review & Create
Review your configuration and click **Create**.
### Step 5: Review & Create
Review your configuration and click **Create**.
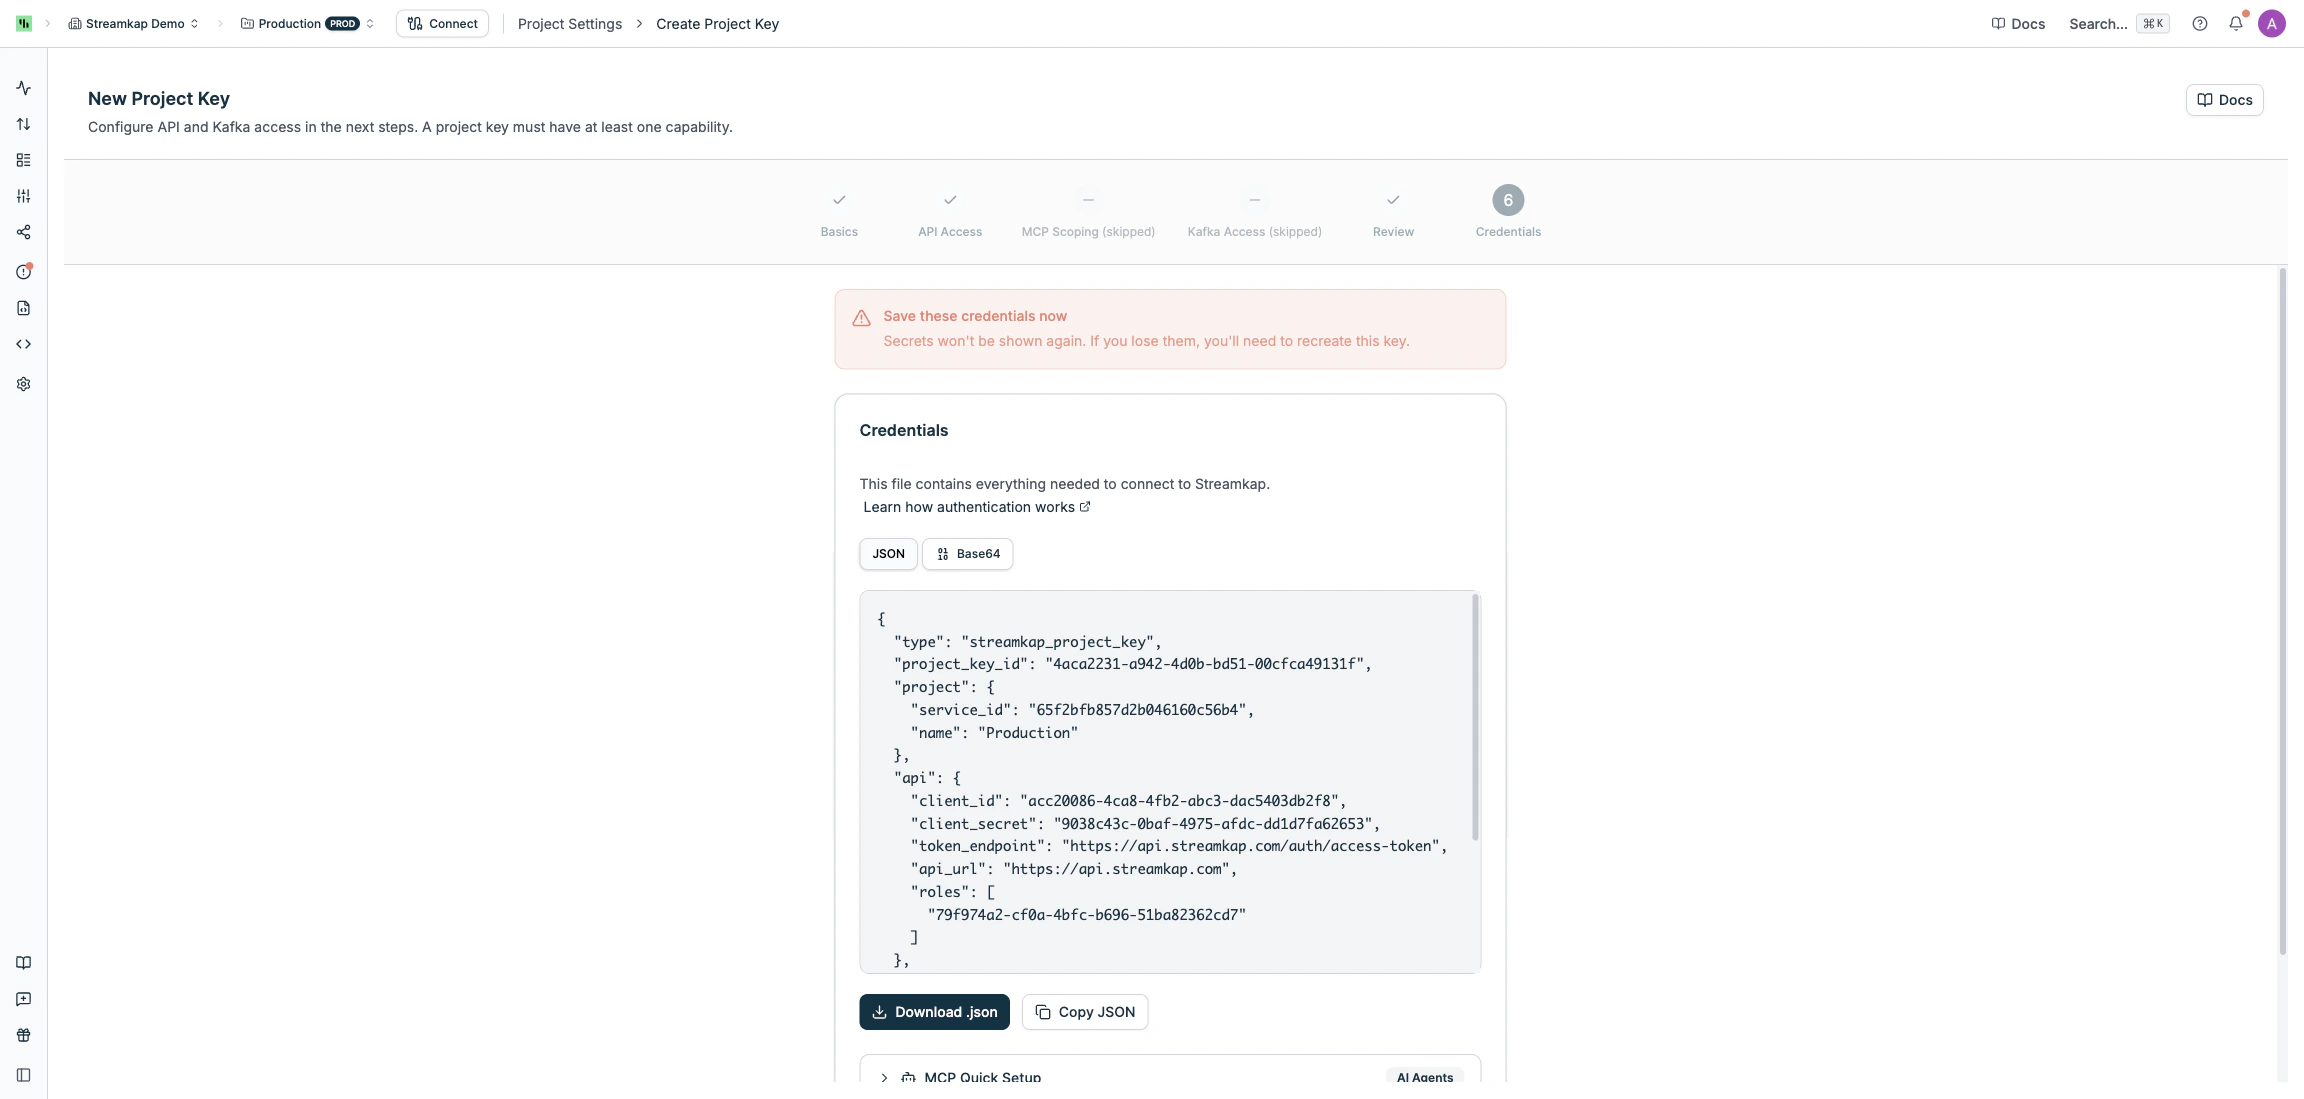
 ### Step 6: Credentials
After creation, the credential file is displayed **once**. You can view it as JSON or Base64, and you must download or copy it before continuing.
Secrets are only shown once. If you lose them, you'll need to delete the key and create a new one.
* **Download .json** — saves as `{key-name}-credentials.json`
* **Copy JSON** or **Copy Base64** — copies to clipboard
The Base64 format is useful for environment variables, Docker secrets, or CI/CD configs.
### Step 6: Credentials
After creation, the credential file is displayed **once**. You can view it as JSON or Base64, and you must download or copy it before continuing.
Secrets are only shown once. If you lose them, you'll need to delete the key and create a new one.
* **Download .json** — saves as `{key-name}-credentials.json`
* **Copy JSON** or **Copy Base64** — copies to clipboard
The Base64 format is useful for environment variables, Docker secrets, or CI/CD configs.
 ### Credential File Structure
The downloaded file contains everything needed to connect:
```json theme={null}
{
"type": "streamkap_project_key",
"project_key_id": "c1e9c152-...",
"project": {
"service_id": "65e94bbe...",
"name": "Production"
},
"api": {
"client_id": "894d9f53-...",
"client_secret": "9ea4e916-...",
"token_endpoint": "https://api.streamkap.com/auth/access-token",
"api_url": "https://api.streamkap.com",
"roles": ["eb6b0ab4-..."]
},
"kafka": {
"username": "my-consumer",
"password": "your-password",
"bootstrap_servers": "tenant-prod-my-consumer.streamkap.net:32400,...",
"security_protocol": "SASL_SSL",
"sasl_mechanism": "PLAIN",
"schema_registry_url": null
},
"tool_profile": "agent-operator",
"allowed_tools": null,
"blocked_tools": ["streamkap_delete_pipeline"],
"created_at": "2026-03-26T15:21:16.354052Z"
}
```
The `api` section is `null` for Kafka-only keys, and the `kafka` section is `null` for API-only keys.
## Authentication
A Project Key with API access can authenticate with the Streamkap API in two ways.
### Option 1: Pass the entire credential file
Send the full credential file as the `project_key` field to the [Get Access Token](/api-reference/authentication/access-token) endpoint. The file can be passed as **Base64-encoded** string or as a **raw JSON** object — both formats are accepted.
```bash theme={null}
# Base64-encode the credential file
PK_BLOB=$(base64 < my-key-credentials.json)
# Exchange for a JWT access token
curl -X POST https://api.streamkap.com/auth/access-token \
-H "Content-Type: application/json" \
-d "{\"project_key\": \"$PK_BLOB\"}"
```
Use **Base64** when passing the key as an environment variable, HTTP header, or in contexts that don't support nested JSON. Use **raw JSON** when calling the API directly and nesting is convenient.
### Option 2: Extract Client ID and Secret
You can extract `api.client_id` and `api.client_secret` from the credential file and pass them as `client_id` / `secret` in the request body — the same fields used by standalone API tokens. This works with the interactive [API Reference](/api-reference/authentication/access-token) playground.
```bash theme={null}
curl -X POST https://api.streamkap.com/auth/access-token \
-H "Content-Type: application/json" \
-d '{"client_id": "", "secret": ""}'
```
Both options return `access_token` and `refresh_token`. Use the access token as a Bearer token for all subsequent API calls.
## Using Your Project Key
[Authenticate](#authentication) using the full credential file or extracted Client ID and Secret, then use the JWT to call any endpoint:
```bash theme={null}
curl -X GET https://api.streamkap.com/api/pipelines \
-H "Authorization: Bearer $ACCESS_TOKEN"
```
You can also try this interactively in the [API Reference](/api-reference/authentication/access-token) playground using the extracted `client_id` and `secret`.
The [MCP Server](/mcp-server) accepts a Project Key directly — no need to extract individual credentials. This is the recommended way to authenticate AI agents, as it also enables [MCP tool scoping](#step-3-mcp-scoping).
**Local mode (stdio):**
```bash theme={null}
STREAMKAP_PROJECT_KEY=$(base64 < my-key-credentials.json) \
npx -y @streamkap/tools
```
**Remote mode (HTTP):**
```bash theme={null}
claude mcp add --scope user \
--header "X-Streamkap-Project-Key: $(base64 < my-key-credentials.json)" \
--transport http \
streamkap https://mcp.streamkap.com/mcp
```
Or in `.mcp.json`:
```json theme={null}
{
"mcpServers": {
"streamkap": {
"type": "http",
"url": "https://mcp.streamkap.com/mcp",
"headers": {
"X-Streamkap-Project-Key": ""
}
}
}
}
```
When using a Project Key, tool scoping is enforced automatically based on the key's configuration. See the [MCP Server](/mcp-server) docs for setup instructions for other clients (VS Code Copilot, Claude Desktop, etc.).
The [Streamkap CLI](/cli) uses the Client ID and Secret from the credential file:
```bash theme={null}
export STREAMKAP_CLIENT_ID=""
export STREAMKAP_CLIENT_SECRET=""
streamkap doctor # Verify connectivity
streamkap pipelines list
```
API-only and API+Kafka keys work with the CLI. Kafka-only keys cannot be used with the CLI.
Use the credentials from the `kafka` section of the file:
```python theme={null}
from confluent_kafka import Consumer
consumer = Consumer({
"bootstrap.servers": "tenant-prod-my-consumer.streamkap.net:32400,...",
"security.protocol": "SASL_SSL",
"sasl.mechanism": "PLAIN",
"sasl.username": "my-consumer",
"sasl.password": "your-password",
"group.id": "my-consumer-group",
})
consumer.subscribe(["my-topic"])
```
Connection details:
| Setting | Value |
| ----------------- | ----------------------------------------------------- |
| Bootstrap Servers | From `kafka.bootstrap_servers` in the credential file |
| Security Protocol | `SASL_SSL` |
| SASL Mechanism | `PLAIN` |
| Username | From `kafka.username` |
| Password | From `kafka.password` |
If Schema Registry was enabled, the URL and credentials are also included in the file.
Use the Client ID and Secret from the `api` section:
```hcl theme={null}
provider "streamkap" {
client_id = ""
client_secret = ""
}
```
See [Terraform Provider](/streamkap-provider-for-terraform) for full configuration.
## Manage Project Keys
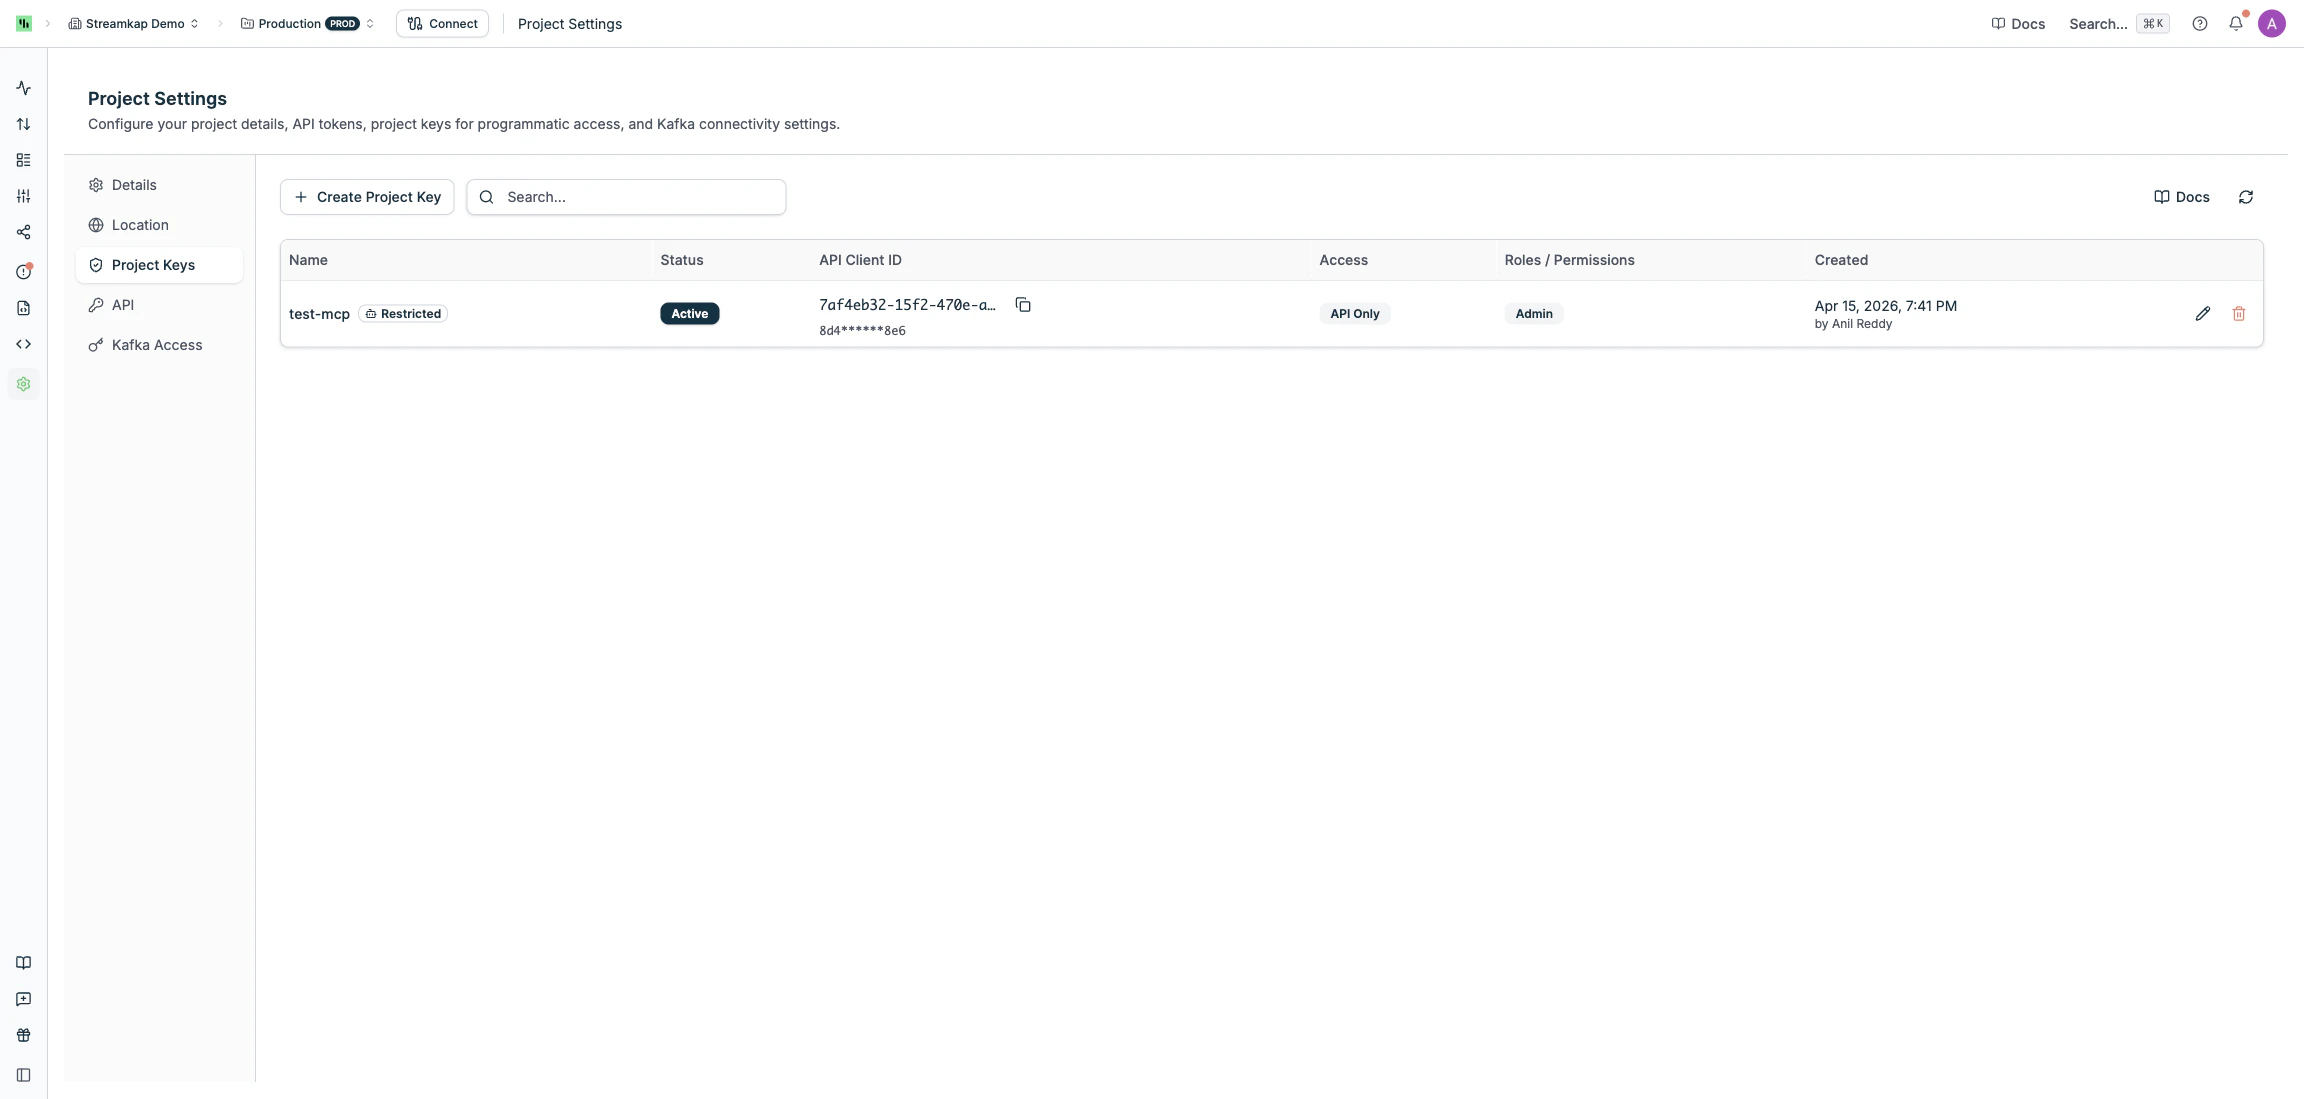
### Viewing Keys
The **Project Keys** list shows all keys for the current project with their status, access type, roles, and creation date.
### Credential File Structure
The downloaded file contains everything needed to connect:
```json theme={null}
{
"type": "streamkap_project_key",
"project_key_id": "c1e9c152-...",
"project": {
"service_id": "65e94bbe...",
"name": "Production"
},
"api": {
"client_id": "894d9f53-...",
"client_secret": "9ea4e916-...",
"token_endpoint": "https://api.streamkap.com/auth/access-token",
"api_url": "https://api.streamkap.com",
"roles": ["eb6b0ab4-..."]
},
"kafka": {
"username": "my-consumer",
"password": "your-password",
"bootstrap_servers": "tenant-prod-my-consumer.streamkap.net:32400,...",
"security_protocol": "SASL_SSL",
"sasl_mechanism": "PLAIN",
"schema_registry_url": null
},
"tool_profile": "agent-operator",
"allowed_tools": null,
"blocked_tools": ["streamkap_delete_pipeline"],
"created_at": "2026-03-26T15:21:16.354052Z"
}
```
The `api` section is `null` for Kafka-only keys, and the `kafka` section is `null` for API-only keys.
## Authentication
A Project Key with API access can authenticate with the Streamkap API in two ways.
### Option 1: Pass the entire credential file
Send the full credential file as the `project_key` field to the [Get Access Token](/api-reference/authentication/access-token) endpoint. The file can be passed as **Base64-encoded** string or as a **raw JSON** object — both formats are accepted.
```bash theme={null}
# Base64-encode the credential file
PK_BLOB=$(base64 < my-key-credentials.json)
# Exchange for a JWT access token
curl -X POST https://api.streamkap.com/auth/access-token \
-H "Content-Type: application/json" \
-d "{\"project_key\": \"$PK_BLOB\"}"
```
Use **Base64** when passing the key as an environment variable, HTTP header, or in contexts that don't support nested JSON. Use **raw JSON** when calling the API directly and nesting is convenient.
### Option 2: Extract Client ID and Secret
You can extract `api.client_id` and `api.client_secret` from the credential file and pass them as `client_id` / `secret` in the request body — the same fields used by standalone API tokens. This works with the interactive [API Reference](/api-reference/authentication/access-token) playground.
```bash theme={null}
curl -X POST https://api.streamkap.com/auth/access-token \
-H "Content-Type: application/json" \
-d '{"client_id": "", "secret": ""}'
```
Both options return `access_token` and `refresh_token`. Use the access token as a Bearer token for all subsequent API calls.
## Using Your Project Key
[Authenticate](#authentication) using the full credential file or extracted Client ID and Secret, then use the JWT to call any endpoint:
```bash theme={null}
curl -X GET https://api.streamkap.com/api/pipelines \
-H "Authorization: Bearer $ACCESS_TOKEN"
```
You can also try this interactively in the [API Reference](/api-reference/authentication/access-token) playground using the extracted `client_id` and `secret`.
The [MCP Server](/mcp-server) accepts a Project Key directly — no need to extract individual credentials. This is the recommended way to authenticate AI agents, as it also enables [MCP tool scoping](#step-3-mcp-scoping).
**Local mode (stdio):**
```bash theme={null}
STREAMKAP_PROJECT_KEY=$(base64 < my-key-credentials.json) \
npx -y @streamkap/tools
```
**Remote mode (HTTP):**
```bash theme={null}
claude mcp add --scope user \
--header "X-Streamkap-Project-Key: $(base64 < my-key-credentials.json)" \
--transport http \
streamkap https://mcp.streamkap.com/mcp
```
Or in `.mcp.json`:
```json theme={null}
{
"mcpServers": {
"streamkap": {
"type": "http",
"url": "https://mcp.streamkap.com/mcp",
"headers": {
"X-Streamkap-Project-Key": ""
}
}
}
}
```
When using a Project Key, tool scoping is enforced automatically based on the key's configuration. See the [MCP Server](/mcp-server) docs for setup instructions for other clients (VS Code Copilot, Claude Desktop, etc.).
The [Streamkap CLI](/cli) uses the Client ID and Secret from the credential file:
```bash theme={null}
export STREAMKAP_CLIENT_ID=""
export STREAMKAP_CLIENT_SECRET=""
streamkap doctor # Verify connectivity
streamkap pipelines list
```
API-only and API+Kafka keys work with the CLI. Kafka-only keys cannot be used with the CLI.
Use the credentials from the `kafka` section of the file:
```python theme={null}
from confluent_kafka import Consumer
consumer = Consumer({
"bootstrap.servers": "tenant-prod-my-consumer.streamkap.net:32400,...",
"security.protocol": "SASL_SSL",
"sasl.mechanism": "PLAIN",
"sasl.username": "my-consumer",
"sasl.password": "your-password",
"group.id": "my-consumer-group",
})
consumer.subscribe(["my-topic"])
```
Connection details:
| Setting | Value |
| ----------------- | ----------------------------------------------------- |
| Bootstrap Servers | From `kafka.bootstrap_servers` in the credential file |
| Security Protocol | `SASL_SSL` |
| SASL Mechanism | `PLAIN` |
| Username | From `kafka.username` |
| Password | From `kafka.password` |
If Schema Registry was enabled, the URL and credentials are also included in the file.
Use the Client ID and Secret from the `api` section:
```hcl theme={null}
provider "streamkap" {
client_id = ""
client_secret = ""
}
```
See [Terraform Provider](/streamkap-provider-for-terraform) for full configuration.
## Manage Project Keys
### Viewing Keys
The **Project Keys** list shows all keys for the current project with their status, access type, roles, and creation date.
 ### Key Status
| Status | Meaning |
| ----------------- | -------------------------------------------- |
| **Active** | Ready to use |
| **Creating** | Provisioning in progress |
| **Failed** | Creation failed — you can retry or delete |
| **Deleting** | Deletion in progress |
| **Delete Failed** | Deletion partially failed — retry the delete |
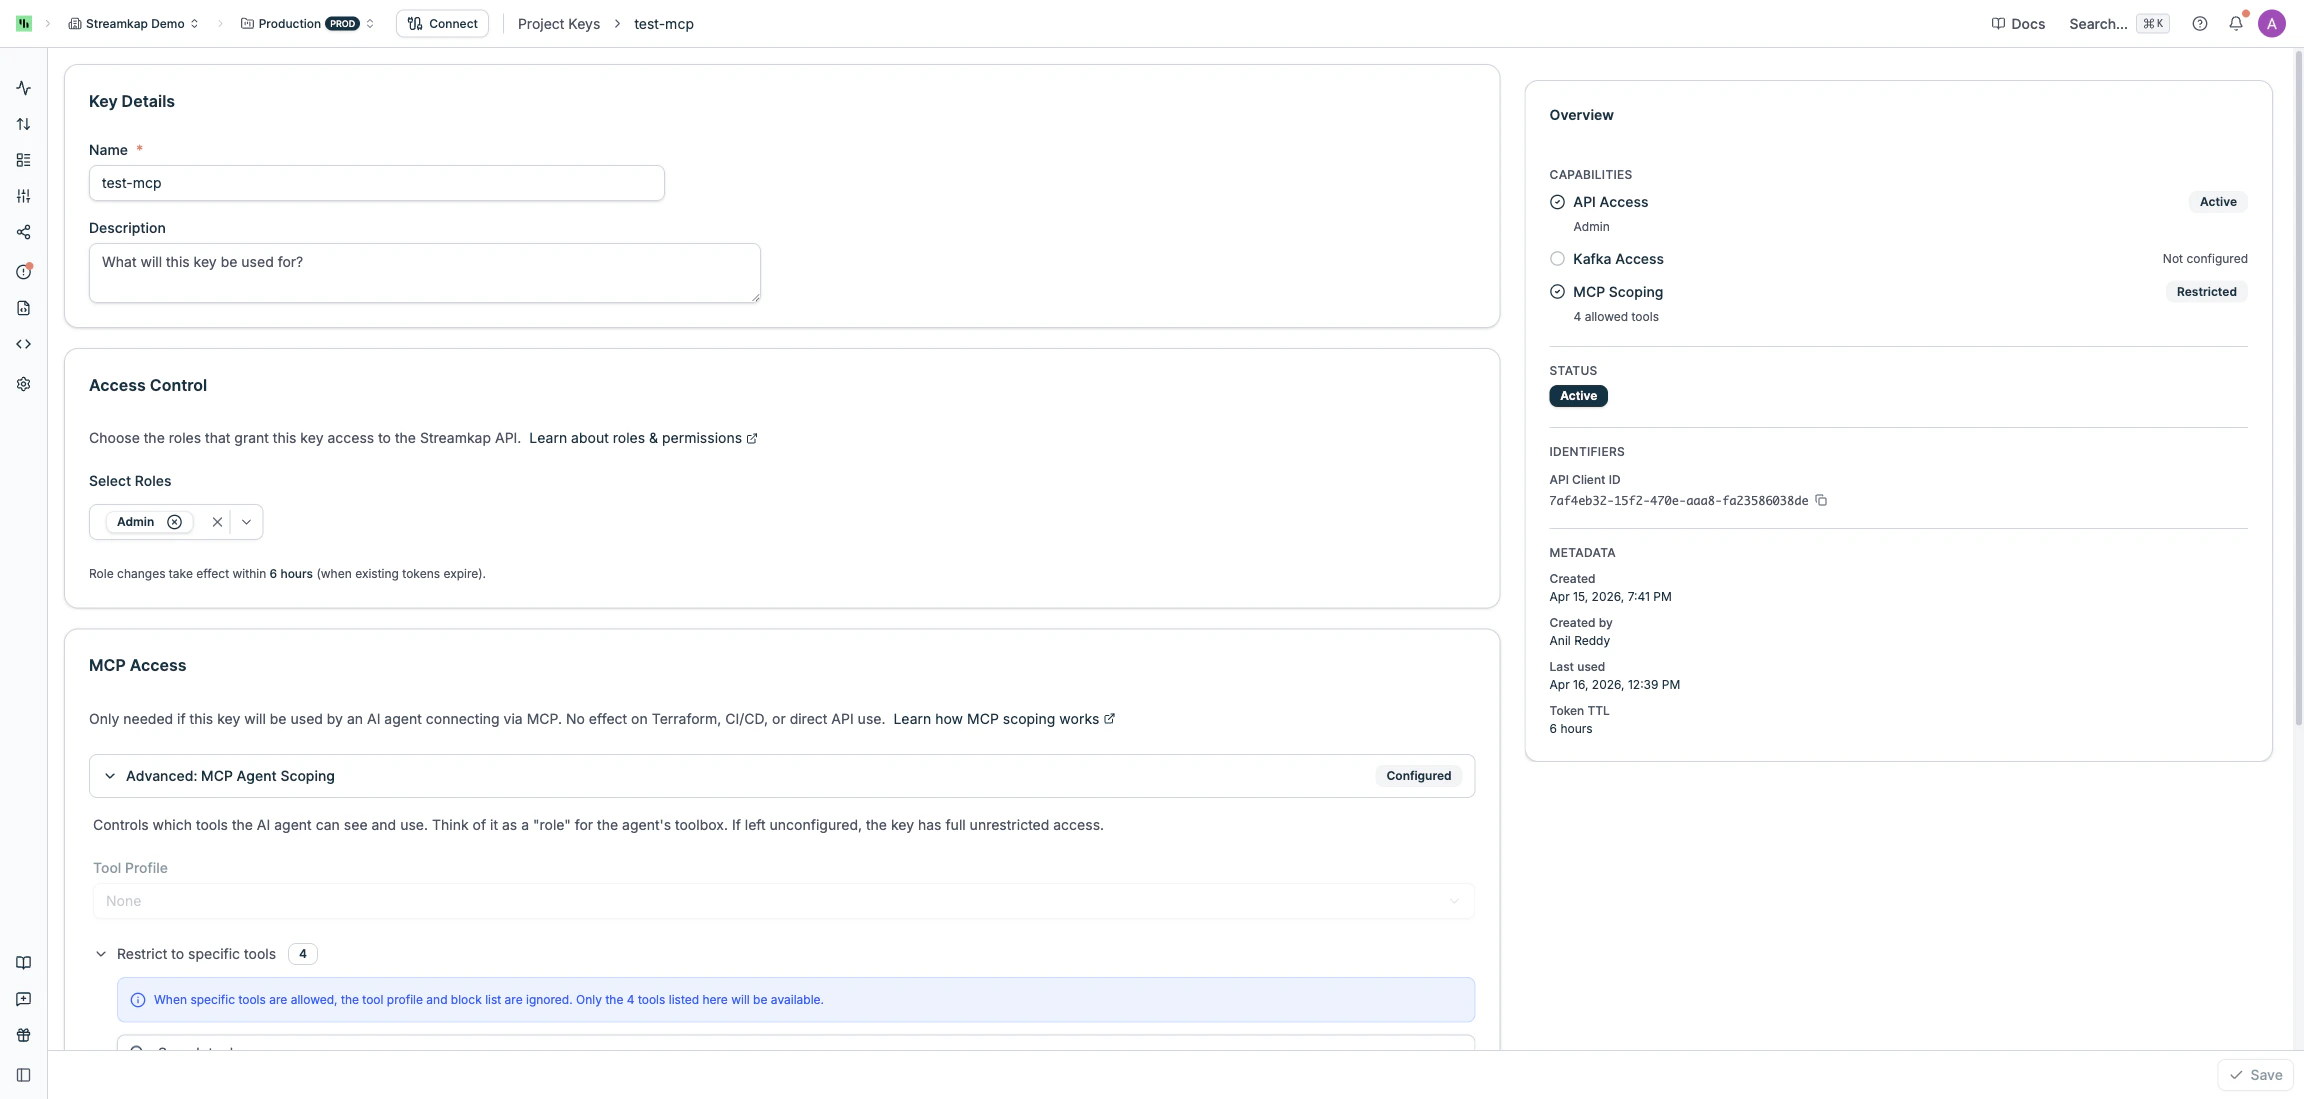
### Editing a Key
Click the **Edit** button on any active key to change:
* **Name** and **Description**
* **Roles** (if the key uses role-based API access)
* **MCP tool scoping** (profile, allowed tools, blocked tools)
* **Kafka ACLs** and **Safe listed IPs** (if the key has Kafka access)
The sidebar shows the key's capabilities, status, identifiers, and metadata (including last used time and token TTL).
Role changes take effect when existing access tokens expire (typically within a few hours). The key does not need to be recreated.
### Key Status
| Status | Meaning |
| ----------------- | -------------------------------------------- |
| **Active** | Ready to use |
| **Creating** | Provisioning in progress |
| **Failed** | Creation failed — you can retry or delete |
| **Deleting** | Deletion in progress |
| **Delete Failed** | Deletion partially failed — retry the delete |
### Editing a Key
Click the **Edit** button on any active key to change:
* **Name** and **Description**
* **Roles** (if the key uses role-based API access)
* **MCP tool scoping** (profile, allowed tools, blocked tools)
* **Kafka ACLs** and **Safe listed IPs** (if the key has Kafka access)
The sidebar shows the key's capabilities, status, identifiers, and metadata (including last used time and token TTL).
Role changes take effect when existing access tokens expire (typically within a few hours). The key does not need to be recreated.
 ### Adding Capabilities
You can add API or Kafka access to an existing key without recreating it:
* **Add Kafka to an API-only key** — click **Add Kafka Access** on the edit page and configure username, password, and ACLs
* **Add API to a Kafka-only key** — click **Add API Credentials** and assign roles or permissions
When you add a capability, new credentials are shown once (just like at creation). Your existing credentials remain unchanged.
### Rotating Kafka Password
On the edit page for a key with Kafka access, use the **Rotate Password** option to set a new password. The new password takes effect immediately.
Rotating the password will disconnect any active Kafka consumers using the old password. Coordinate with your team before rotating.
### Deleting a Key
Click the **Delete** button to permanently remove a key and all its associated resources (API token, Kafka user, proxy endpoints). This action cannot be undone.
If deletion fails (e.g. due to a transient infrastructure issue), the key moves to **Delete Failed** status. Click **Retry Delete** to try again.
## Linked Resources
API tokens and Kafka users created by a Project Key are managed exclusively through the Project Key. They are protected from independent modification — edits and deletions must be done from the Project Key's edit page.
## Access Types at a Glance
| Type | REST API | Kafka | MCP Scoping | Requirements |
| --------------- | -------- | ----- | ----------- | ------------------------ |
| **API Only** | Yes | No | Optional | Any cloud provider |
| **Kafka Only** | No | Yes | No | AWS, dedicated namespace |
| **API + Kafka** | Yes | Yes | Optional | AWS, dedicated namespace |
You can start with API-only or Kafka-only and add the other capability later.
## Related
* [MCP Server](/mcp-server) — connect AI agents to Streamkap
* [CLI](/cli) — command-line management tool
* [Terraform Provider](/streamkap-provider-for-terraform) — infrastructure as code for Streamkap resources
* [API Reference](/api-reference/authentication/access-token) — full REST API documentation
* [Team Management](/team-management) — manage roles and permissions
### Adding Capabilities
You can add API or Kafka access to an existing key without recreating it:
* **Add Kafka to an API-only key** — click **Add Kafka Access** on the edit page and configure username, password, and ACLs
* **Add API to a Kafka-only key** — click **Add API Credentials** and assign roles or permissions
When you add a capability, new credentials are shown once (just like at creation). Your existing credentials remain unchanged.
### Rotating Kafka Password
On the edit page for a key with Kafka access, use the **Rotate Password** option to set a new password. The new password takes effect immediately.
Rotating the password will disconnect any active Kafka consumers using the old password. Coordinate with your team before rotating.
### Deleting a Key
Click the **Delete** button to permanently remove a key and all its associated resources (API token, Kafka user, proxy endpoints). This action cannot be undone.
If deletion fails (e.g. due to a transient infrastructure issue), the key moves to **Delete Failed** status. Click **Retry Delete** to try again.
## Linked Resources
API tokens and Kafka users created by a Project Key are managed exclusively through the Project Key. They are protected from independent modification — edits and deletions must be done from the Project Key's edit page.
## Access Types at a Glance
| Type | REST API | Kafka | MCP Scoping | Requirements |
| --------------- | -------- | ----- | ----------- | ------------------------ |
| **API Only** | Yes | No | Optional | Any cloud provider |
| **Kafka Only** | No | Yes | No | AWS, dedicated namespace |
| **API + Kafka** | Yes | Yes | Optional | AWS, dedicated namespace |
You can start with API-only or Kafka-only and add the other capability later.
## Related
* [MCP Server](/mcp-server) — connect AI agents to Streamkap
* [CLI](/cli) — command-line management tool
* [Terraform Provider](/streamkap-provider-for-terraform) — infrastructure as code for Streamkap resources
* [API Reference](/api-reference/authentication/access-token) — full REST API documentation
* [Team Management](/team-management) — manage roles and permissions